COTTON CANDY SKY BEACH TUMBLER!
Hey, guys so I'm starting with this kind of tapered cup I got this one from TJ Maxx. I just love finding different shapes and all of that so this was 12.99 at Marshall's (sorry almost the same store but I love that this one had like a more secure part for the straw so just taking off all the stickers and labels). Then prepping with Mattify of course.
Then I am using my color fix paint taupe peach and the coral island we're going to do kind of a little ombre effect since this is gonna be a beachy cup. I did taupe for the bottom and then the sky I did the peach and coral so just used a makeup brush we do have these on-site or they might be out of stock but we'll restock soon so just smoothing that on there and usually, I do my glitter right over the color fix paint but since we're doing a little more complicated kind of ombre situation I find that the glitter doesn't always stick the best if you're not layering it on and every it's not all wet at the same time so we're just going to do the paint and then let it dry and do the glitter after that. So like I said coral island on the top and then we're going in with peach so just taking those same brushes I used just two for this and just kind of blending it and tapping it back and forth then I just kind of keep smoothing it around the cup just to get a more blended effect which we are covering this with glitter so you're not going to see any lines or anything we just kind of wanted some color underneath. so just keep working with it until you like how it looks. The same thing with the other two shades at the bottom just kind of tapping and then swiping back and forth to kind of blend it all together.


That's what it was looking like so I let it dry then I'm going in with my glitter glue this is going to adhere the glitter well to the cup so I just like to spread it or sorry squirt it all over the cup and then spread it out. This is just the medium brush that we have on the site it works well to kind of smooth it out. But I remembered josh told me that someone said that they just used a glove to apply the glitter glue so I thought I would try it and this is amazing I don't think I'll use a brush anymore unless I'm just doing like one little section or something but it was so much easier to get the whole cup covered it's very similar to the epoxy method but even more kind of smooth so now I'm taking the white cap in medium just doing a full coverage on the entire cup. So white cap is a white opal iridescent color so you're just gonna be able to see the color of the paint peek through just a little bit. So that's what it's looking like I wanted the glitter to be a little bit more metallic looking so instead of doing the tack it method where you kind of just rub hard on the cup we're just kind of tapping and smoothing it around with some this is just like a parchment paper sheet so anything like this you can sort of just press it down and all we're doing is making the glitter lay flat to the cup and it gives it that more like iridescent metallic looking rather than like chunky glitter with kind of sticking up everywhere. This is something you can do with the glitter glue it's not entirely the tack it method it's kind of in-between tack it and you know just chunky glitter on your cup. As you can see it just adds a little bit more of that metallic shine so once that was dry I used the clear matte spray paint to seal it then went in with our first layer of the artistry epoxy this is the one-to-one facet.


Then once that was dry another layer so first I just went on all over with clear then I'm taking my wave white and I did three pumps of that in I want to say this was three-quarters of an ounce and I am just adding some waves on the bottom so kind of just squiggly lines and I think my son was playing with the light at this point in the warehouse um but yeah just kind of add some little squiggly lines at the bottom for your waves. Then at the top for the more clouds I kind of just tap this on with the stir stick and just kind of smear it around to make it look a little bit more like little puffy clouds. Just a little bit more of a translucent white look up there and just not using much product just kind of spreading it out and kind of operating like a swirl motion to get kind of fluffy cloud look so then to kind of blow out my waves and give it that like foamy look which the wave white will give you I'm taking my embossing gun and just using it on. Just one little spot at a time so that way your epoxy doesn't overheat and start running so like I said I just did that one little section and I left it for a few minutes then I came back and did another section and you're just going to continue this till all the waves are done but I love that kind of foamy selling look that you get from the waving white and it is a little more tricky to do on cups. Still, if you're patient it works so I wanted to add a little sparkle in the sky this is enchanted in a chunky mix so I'm just using my fingernail to kind of sprinkle it on here and there just in random little spots up in the clouds. and I did that while I was waiting for the epoxy to be kind of cool so I had a couple more waves to do so you can just see the kind of selling and foaminess that it gives. so then I didn't film it but I did one more layer of clear right here. I wanted to add a little bit more color to our sky this is rose quartz mica powder.


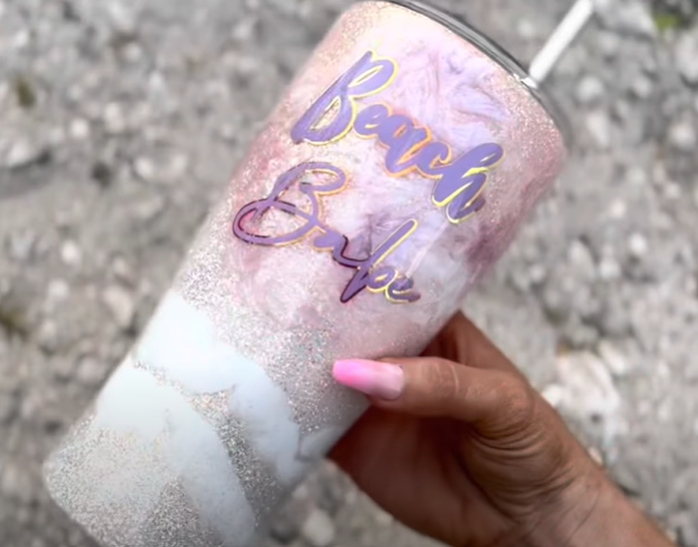
You don't need much to do what we're doing with the sky so ignore how much is in there but you're just gonna mix some mica powder in and I wanted to do kind of like a more cotton candy cloud look so I'm just doing the same thing that I did with the white and just kind of in little circular motions just kind of spreading it out and I'm not using much epoxy at all you'll see like a tiny tiny bit goes a long way and we're just adding a little bit of color but you could do this with any colors you wanted to I just was feeling the pinky peachy purpley vibes so that's what I went with. So then I wanted to add a little bit more of a purpley shade so I took amethyst mica powder and I just added some of that into the pink as it was just to give it a little more purple tin and then did the same thing just kind of adding a little bit more color here and there. but I think this effect turned out beautiful with the wave white and then the mica powders on top to give it just a little bit of color and shimmer so yes I think it turned out like a cotton candy sky and I can't wait to try other colors. so then taking some purple vinyl I cut out beach babe. then just weeding out the middle part then I took this kind of opal iridescent color and I did an offset so than going to transfer them on the cup and stack them together.
Then finally on my cup and I like to stand it up just to make sure it's level I feel like looking at it when it's standing and like on a flat surface it just makes it so much easier so I thought it was good where it was and just pressed it down and peeled the tape off. then I did one more coat of epoxy to finish off this pretty little beach cup and this cup is the new cup I'm using this cup I love it that much let me know what you guys think and if you guys are going to try out this kind of sky cotton candy sky technique I am so excited about it I just think it turned out really amazing and so cute that is it for this video thank you guys so much for watching I will see you guys.
Related Posts

DiY Epoxy vs. Artistry Epoxy: What Happened to “Speedy Petey” and What’s the Best Epoxy for Tumblers & Art?

How Long Does It Take for Epoxy to Yellow (And How to Prevent or Fix It Like a Pro)

Top Reasons Why Your Epoxy Is Sticky and How to Avoid Them

Top 10 Epoxy Tumbler Ideas with Glitter, Pigments & More

How to Mix Epoxy Resin Like a Pro: The Ultimate Guide for Tumbler Artists & DIY Crafters

BRIDAL Tumbler Tutorial using Shape Tape Double sided adhesive sheets!
