ALCOHOL INK BARNWOOD Tumbler Tutorial! Day 2 of 10 Days of Fall!
https://youtu.be/aCg2QEGkdT8
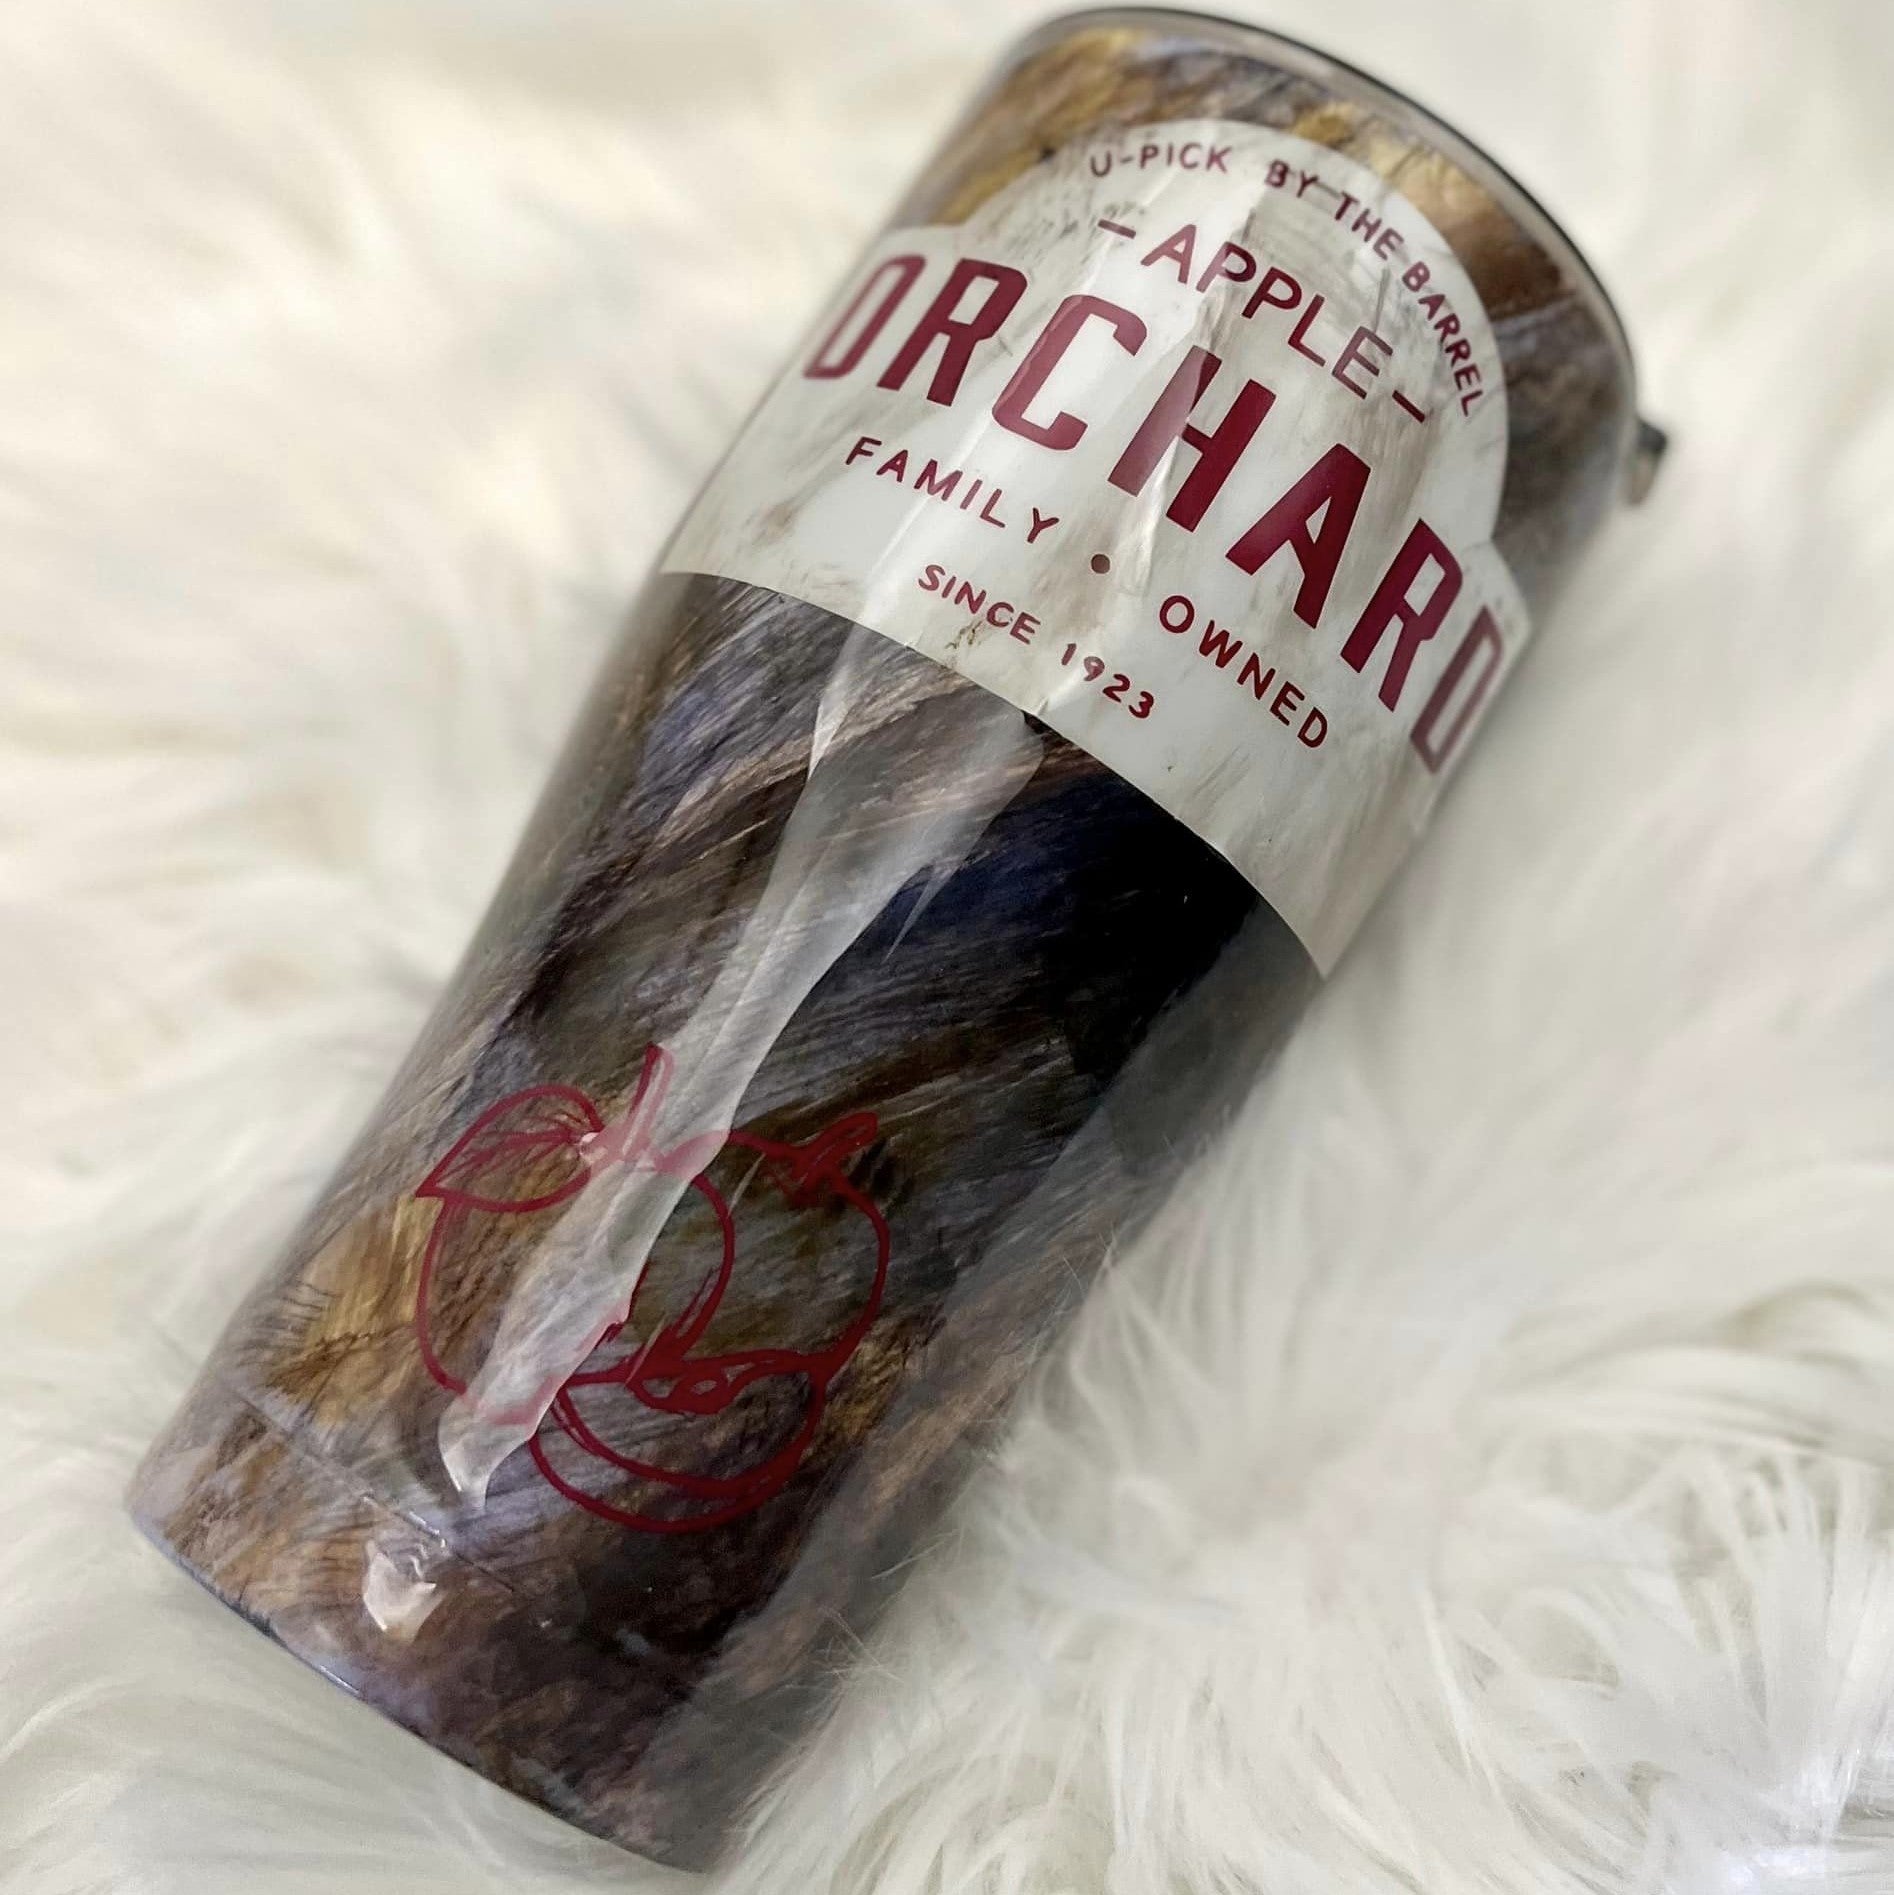
Hey guys, welcome to my day two of ten days of fall. Today's tutorial is on this beautiful barn wood style apple orchard-themed cup. This is done with alcohol ink. I love how it turned out. This is only my second wood grain Cup, and my first one was on my channel probably a year ago. Yes, there's something about fall and apple picking where I'm from Idaho, we used to go to this fun little place where they had all these apple pumpkin farms like all the things to do in fall in Texas. I don't think we have that here. So I'm kind of sad, but I'm going to need to find some new fall traditions here in Texas, and sweaters are not going to be one of them. It is hot; I currently have the ac off, and it's getting hotter here by the second. So let's get back to the cup if you want to see how I got this look.
Let's get into the tutorial, and don't forget to come back tomorrow for day three. Let's start with this 30-ounce tapered cup from hog, taking off the lid and prepping with mattify once that is done. I'm just doing a white base using the flat white rust-oleum paint. I always like to use a white base when I'm doing alcohol ink wood grain.


 Once that is dry, I use some alcohol ink. These are just some different browns espresso teakwood and latte. I like to combine the different tones of brown, so I'm just squirting some of them onto a piece of wax paper. You could use a tray. This is what I had, so I took a firm, stiff brush, dipped that in there, and swirled it on the cup. I wouldn't say I like straight lines because wood grain is not linear, but it does go in bars. It's not straightforward, so I make little wavy patterns dipping back in.
And then to create little knots in the wood, I do circles, and like little swoopy motions, you'll see what I mean. Still, I keep going with this method until the whole cup is covered, so here I'm just forming my knots a little more. You keep dipping back into the alcohol ink and back onto the knot, making it smaller and smaller, more concentrated in the middle and look like an actual wood knot. It's just effortless to make this technique look realistic with alcohol ink.
Once that is dry, I use some alcohol ink. These are just some different browns espresso teakwood and latte. I like to combine the different tones of brown, so I'm just squirting some of them onto a piece of wax paper. You could use a tray. This is what I had, so I took a firm, stiff brush, dipped that in there, and swirled it on the cup. I wouldn't say I like straight lines because wood grain is not linear, but it does go in bars. It's not straightforward, so I make little wavy patterns dipping back in.
And then to create little knots in the wood, I do circles, and like little swoopy motions, you'll see what I mean. Still, I keep going with this method until the whole cup is covered, so here I'm just forming my knots a little more. You keep dipping back into the alcohol ink and back onto the knot, making it smaller and smaller, more concentrated in the middle and look like an actual wood knot. It's just effortless to make this technique look realistic with alcohol ink.


 Then I sealed it with some clear matte spray paint. Then this is where it all went wrong. I was trying to do like a white like almost make it look like a white washed wood like white barn wood. It just did not work how I pictured it in my head, so I ended up taking off that epoxy, and I used alcohol to do that, and even though I sealed it, it still messed up the wood grain I had done. I don't know if I should have closed it more or if it still would have just messed it up. Still, I decided let's go with a barn wood look. Let's add some black and white to this, just the same technique going on with a kind of stiff brush just swiping along those same Motions for some reason. The black alcohol ink looks slightly like blue or purple than black. Still, I think it ends up looking type of like barn wood. If it were painted a blue or gray at one point, you'd see how it kind of transforms and comes together. I was kind of nervous at this point but adding the white.
Then I decided to add a little bit more brown; this is one of the darker browns to bring it back in. I don't know. It looked a little too like white blue. So this helped tone that down and made it look more like aged wood.
But I'm sure you can do this with many different colors, different types of alcohol ink, or other brands and get this cool, like just aged wood look. I wanted to go with this kind of apple orchard theme. I found this apple orchard decal on Etsy; I will link it down below, and I just made it in one of my apps like a little thing to go behind it.
Then I sealed it with some clear matte spray paint. Then this is where it all went wrong. I was trying to do like a white like almost make it look like a white washed wood like white barn wood. It just did not work how I pictured it in my head, so I ended up taking off that epoxy, and I used alcohol to do that, and even though I sealed it, it still messed up the wood grain I had done. I don't know if I should have closed it more or if it still would have just messed it up. Still, I decided let's go with a barn wood look. Let's add some black and white to this, just the same technique going on with a kind of stiff brush just swiping along those same Motions for some reason. The black alcohol ink looks slightly like blue or purple than black. Still, I think it ends up looking type of like barn wood. If it were painted a blue or gray at one point, you'd see how it kind of transforms and comes together. I was kind of nervous at this point but adding the white.
Then I decided to add a little bit more brown; this is one of the darker browns to bring it back in. I don't know. It looked a little too like white blue. So this helped tone that down and made it look more like aged wood.
But I'm sure you can do this with many different colors, different types of alcohol ink, or other brands and get this cool, like just aged wood look. I wanted to go with this kind of apple orchard theme. I found this apple orchard decal on Etsy; I will link it down below, and I just made it in one of my apps like a little thing to go behind it.


 I used this kind of deep red vinyl for this. I thought that would look nice because apples are red, and it just worked golden things, and I should have made this decal a little smaller because it is tapered a little bit at the top even so it just didn't want to wrap around nice and Smooth, but I worked with it and made it work.
So you can see it folded and overlapped, so I just took that off with one of our needle pens and replaced it on there, but if this had been half an inch smaller, it would have been so much easier to place this on.
I ended up adding a little apple decal on the bottom. Unfortunately, my phone died before it stopped recording, so I didn't get that footage, but I did two layers of epoxy, and this cup was done. I did end up adding a little bit of alcohol ink on the decal as well to give it a little distressed look, but this is the final look. I love how it turned out.
It just looks like an ancient Aged, either tree or barn wood, and I love apples and apple picking in the fall like it's just the fall thing to do, so that is it for this tutorial. I hope you guys like it and I will see you at the next one.
I used this kind of deep red vinyl for this. I thought that would look nice because apples are red, and it just worked golden things, and I should have made this decal a little smaller because it is tapered a little bit at the top even so it just didn't want to wrap around nice and Smooth, but I worked with it and made it work.
So you can see it folded and overlapped, so I just took that off with one of our needle pens and replaced it on there, but if this had been half an inch smaller, it would have been so much easier to place this on.
I ended up adding a little apple decal on the bottom. Unfortunately, my phone died before it stopped recording, so I didn't get that footage, but I did two layers of epoxy, and this cup was done. I did end up adding a little bit of alcohol ink on the decal as well to give it a little distressed look, but this is the final look. I love how it turned out.
It just looks like an ancient Aged, either tree or barn wood, and I love apples and apple picking in the fall like it's just the fall thing to do, so that is it for this tutorial. I hope you guys like it and I will see you at the next one.
Once that is dry, I use some alcohol ink. These are just some different browns espresso teakwood and latte. I like to combine the different tones of brown, so I'm just squirting some of them onto a piece of wax paper. You could use a tray. This is what I had, so I took a firm, stiff brush, dipped that in there, and swirled it on the cup. I wouldn't say I like straight lines because wood grain is not linear, but it does go in bars. It's not straightforward, so I make little wavy patterns dipping back in.
And then to create little knots in the wood, I do circles, and like little swoopy motions, you'll see what I mean. Still, I keep going with this method until the whole cup is covered, so here I'm just forming my knots a little more. You keep dipping back into the alcohol ink and back onto the knot, making it smaller and smaller, more concentrated in the middle and look like an actual wood knot. It's just effortless to make this technique look realistic with alcohol ink.
Then I sealed it with some clear matte spray paint. Then this is where it all went wrong. I was trying to do like a white like almost make it look like a white washed wood like white barn wood. It just did not work how I pictured it in my head, so I ended up taking off that epoxy, and I used alcohol to do that, and even though I sealed it, it still messed up the wood grain I had done. I don't know if I should have closed it more or if it still would have just messed it up. Still, I decided let's go with a barn wood look. Let's add some black and white to this, just the same technique going on with a kind of stiff brush just swiping along those same Motions for some reason. The black alcohol ink looks slightly like blue or purple than black. Still, I think it ends up looking type of like barn wood. If it were painted a blue or gray at one point, you'd see how it kind of transforms and comes together. I was kind of nervous at this point but adding the white.
Then I decided to add a little bit more brown; this is one of the darker browns to bring it back in. I don't know. It looked a little too like white blue. So this helped tone that down and made it look more like aged wood.
But I'm sure you can do this with many different colors, different types of alcohol ink, or other brands and get this cool, like just aged wood look. I wanted to go with this kind of apple orchard theme. I found this apple orchard decal on Etsy; I will link it down below, and I just made it in one of my apps like a little thing to go behind it.
I used this kind of deep red vinyl for this. I thought that would look nice because apples are red, and it just worked golden things, and I should have made this decal a little smaller because it is tapered a little bit at the top even so it just didn't want to wrap around nice and Smooth, but I worked with it and made it work.
So you can see it folded and overlapped, so I just took that off with one of our needle pens and replaced it on there, but if this had been half an inch smaller, it would have been so much easier to place this on.
I ended up adding a little apple decal on the bottom. Unfortunately, my phone died before it stopped recording, so I didn't get that footage, but I did two layers of epoxy, and this cup was done. I did end up adding a little bit of alcohol ink on the decal as well to give it a little distressed look, but this is the final look. I love how it turned out.
It just looks like an ancient Aged, either tree or barn wood, and I love apples and apple picking in the fall like it's just the fall thing to do, so that is it for this tutorial. I hope you guys like it and I will see you at the next one.
Previous post
FALL VIBES Tumbler Burst Tutorial! Day 1 of 10 Days of Fall!
Next post
COPPER AND BLUES Glitter and Foil Flakes Tumbler Tutorial! Day 3rd of 10 Days of Fall!
Related Posts

DiY Epoxy vs. Artistry Epoxy: What Happened to “Speedy Petey” and What’s the Best Epoxy for Tumblers & Art?
Why You Can’t Find “Speedy Petey” & What Replaced It If you’ve been Googling “Speedy Petey epoxy” and coming up empty, here’s the short...
Nov 06 2025

How Long Does It Take for Epoxy to Yellow (And How to Prevent or Fix It Like a Pro)
How Long Before Epoxy Resin Turns Yellow? One of the most common questions in the epoxy art and crafts world is: “How long before...
Jul 08 2025

Top Reasons Why Your Epoxy Is Sticky and How to Avoid Them
Whether you're designing a sparkling glitter tumbler, pouring a stunning river table, or experimenting with colorful resin art, few things are more disappointing than...
Jun 30 2025

Top 10 Epoxy Tumbler Ideas with Glitter, Pigments & More
Crafting epoxy tumblers is one of the most exciting and rewarding trends in the DIY world. Whether you're making a custom tumbler for personal...
Jun 25 2025

How to Mix Epoxy Resin Like a Pro: The Ultimate Guide for Tumbler Artists & DIY Crafters
Epoxy resin is a total game-changer for DIY crafters—especially tumbler makers who love that smooth, glass-like finish. But even the most creative designs can...
Jun 22 2025

BRIDAL Tumbler Tutorial using Shape Tape Double sided adhesive sheets!
Today, we're diving into a fun DIY project: creating a beautiful bride cup using a few of our favorite products, including shape tape, epoxy,...
May 17 2024

Is Artistry Epoxy good?
In the realm of DIY projects, home renovations, and artistic endeavors, epoxy resin has emerged as a versatile and captivating medium. Among the myriad...
Mar 27 2024