FALL VIBES Tumbler Burst Tutorial! Day 1 of 10 Days of Fall!
https://youtu.be/MzFXYIW9_WE
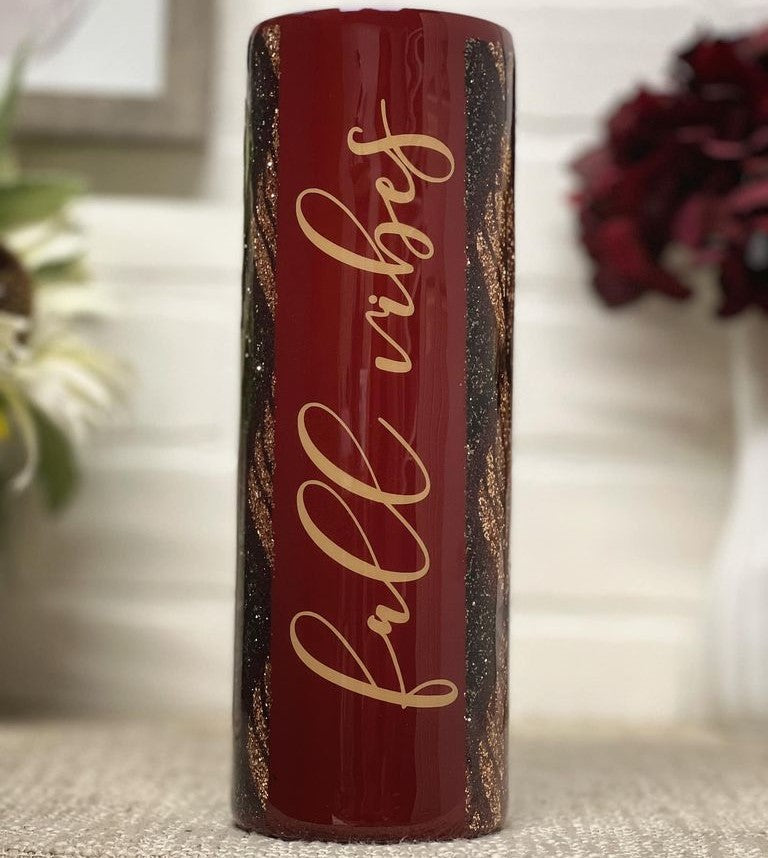
I put together 10 videos for you guys, so every day from today and for the next 10 days will be a new tutorial for you on this channel here. I am so excited so let's get into the first one, this fall vibes cup. I used shape tape to get this look, and I love how this turned out. I love this deep burgundy shade with green and gold. Make sure you guys check out day two tomorrow. I will be doing some giveaways throughout the 10 days of fall. I will try to give away whatever I use to make that cup, so always check the description for how to enter and all the giveaway details.
Like this one, there's the three colors of glitter and the shape tape, and then I will also give away some epoxy with everything, so make sure you enter the giveaways and let's get into the tutorial. I'm starting with this 30-ounce skinny cup and just taking off the lid and the little sticker at the bottom. I prepped it with mattify and an abrasive pad. Next, I'm going on with claret wine rust-oleum spray paint. This is the gorgeous deep red burgundy color. I love it so much.


 I did two coats of it just to ensure it was a nice whole coverage layer of paint. Then, I'm going to use our shape tape double-sided adhesive tape so that you can put different glitter designs or burst templates onto your cup. I am using this filthy mat. It's a light grip. You always want to use a soft grip when using shape tape. You don't want anything sticky. So it's going to grip onto the paper of shape tape. I'm using this design that we have on svgcellars.com. If you want to check that out, I'll have it linked down below.
I am cutting this out on my silhouette, so I have my design. I'm not doing a full wrap. If you are nervous about lining up and ensuring your edges match, just give yourself two to three inches on one side and put someone's name or a cute little saying there. It saves you the trouble of getting the two ends to line up perfectly because we all know that is very difficult and doesn't always work. Once you get the shape tape on the cup, it does not want to come off. Just cut the edges off, then I measured, giving myself a couple of inches in the back. Then I can put a little fall saying.
You want to give yourself a room at the top and bottom. I drew a straight line on my cup and will stick shape tape on it. I peeled it and cut off some backing to stick it down without having all the rest peeled off.
I did two coats of it just to ensure it was a nice whole coverage layer of paint. Then, I'm going to use our shape tape double-sided adhesive tape so that you can put different glitter designs or burst templates onto your cup. I am using this filthy mat. It's a light grip. You always want to use a soft grip when using shape tape. You don't want anything sticky. So it's going to grip onto the paper of shape tape. I'm using this design that we have on svgcellars.com. If you want to check that out, I'll have it linked down below.
I am cutting this out on my silhouette, so I have my design. I'm not doing a full wrap. If you are nervous about lining up and ensuring your edges match, just give yourself two to three inches on one side and put someone's name or a cute little saying there. It saves you the trouble of getting the two ends to line up perfectly because we all know that is very difficult and doesn't always work. Once you get the shape tape on the cup, it does not want to come off. Just cut the edges off, then I measured, giving myself a couple of inches in the back. Then I can put a little fall saying.
You want to give yourself a room at the top and bottom. I drew a straight line on my cup and will stick shape tape on it. I peeled it and cut off some backing to stick it down without having all the rest peeled off.


 I'm peeling the backing off and sticking it down simultaneously when my silhouette cuts this. Unfortunately, it cut a little too deep on the edges. You'll see where it went through the tape, but it ended okay. I just had to be careful around the edges.
I'm using ace high it's this gorgeous burgundy shade that is coming out in my wild west collection. It'll be coming out soon. I am so excited about it. There are so many gorgeous shades, but just going on with that, and then I like to kind of rub it around just making sure you get excellent glitter coverage. It's going to make sure you get a little piece of glitter stuck in every little nook and cranny of the shape tape so just keep doing that all the way around. I also used this as a small cut, and the other ones that I use are medium cut, so then taking a needle pen to peel off the little leaf parts. I did one line of one color, and the following line will be the other color.
I just go ahead and peel off everything on the cup that's going to be that color, making it more accessible. You're not going back and forth between glittering and peeling-off pieces. Just do the whole cup, whatever you're doing in that color. Now I'm using anaconda in a medium. This was from the tropical collection. It's a pretty deep green with shape tape. You also want to work from darkest to lightest color so that way. You don't have, like if you're using white, let's say. You use a darker color. You're not going to have little pieces of the darker color stuck in your white so just make sure you think about that when working with shape tape. Go from darkest to lightest, that exact thing. Just lay the glitter on and rub it in now. I'm doing all the rest of the leaves to do gold.
I'm peeling the backing off and sticking it down simultaneously when my silhouette cuts this. Unfortunately, it cut a little too deep on the edges. You'll see where it went through the tape, but it ended okay. I just had to be careful around the edges.
I'm using ace high it's this gorgeous burgundy shade that is coming out in my wild west collection. It'll be coming out soon. I am so excited about it. There are so many gorgeous shades, but just going on with that, and then I like to kind of rub it around just making sure you get excellent glitter coverage. It's going to make sure you get a little piece of glitter stuck in every little nook and cranny of the shape tape so just keep doing that all the way around. I also used this as a small cut, and the other ones that I use are medium cut, so then taking a needle pen to peel off the little leaf parts. I did one line of one color, and the following line will be the other color.
I just go ahead and peel off everything on the cup that's going to be that color, making it more accessible. You're not going back and forth between glittering and peeling-off pieces. Just do the whole cup, whatever you're doing in that color. Now I'm using anaconda in a medium. This was from the tropical collection. It's a pretty deep green with shape tape. You also want to work from darkest to lightest color so that way. You don't have, like if you're using white, let's say. You use a darker color. You're not going to have little pieces of the darker color stuck in your white so just make sure you think about that when working with shape tape. Go from darkest to lightest, that exact thing. Just lay the glitter on and rub it in now. I'm doing all the rest of the leaves to do gold.


 Then rolling in with gold fever is just this kind of light gold. This one is also from the wild west collection, which is like the shape tape. I used a clear matte spray paint to seal that. Then we're going in with glitter glue on the bottom to give the base some glitter. I'm just going along that center part, not the whole Bottom, so sprinkling on gold fever, I cut out this fall vibes decal. I got this color vinyl from Michael’s, and it's just the perfect fall color.
So putting that on the blank part of the cup in this vinyl matched perfectly with that gold glitter. It looked so pretty. Then I did two more layers of the epoxy to finish off the cup then it was done. I love the colors and how they turned out. You could do it instead of the dark green, something a little more contrast. You can see that pop a little more, but I just love how it turned out to let me know what you guys think in the comments, and make sure you check out my other fall videos. I'll see you at the next one bye.
Then rolling in with gold fever is just this kind of light gold. This one is also from the wild west collection, which is like the shape tape. I used a clear matte spray paint to seal that. Then we're going in with glitter glue on the bottom to give the base some glitter. I'm just going along that center part, not the whole Bottom, so sprinkling on gold fever, I cut out this fall vibes decal. I got this color vinyl from Michael’s, and it's just the perfect fall color.
So putting that on the blank part of the cup in this vinyl matched perfectly with that gold glitter. It looked so pretty. Then I did two more layers of the epoxy to finish off the cup then it was done. I love the colors and how they turned out. You could do it instead of the dark green, something a little more contrast. You can see that pop a little more, but I just love how it turned out to let me know what you guys think in the comments, and make sure you check out my other fall videos. I'll see you at the next one bye.
I did two coats of it just to ensure it was a nice whole coverage layer of paint. Then, I'm going to use our shape tape double-sided adhesive tape so that you can put different glitter designs or burst templates onto your cup. I am using this filthy mat. It's a light grip. You always want to use a soft grip when using shape tape. You don't want anything sticky. So it's going to grip onto the paper of shape tape. I'm using this design that we have on svgcellars.com. If you want to check that out, I'll have it linked down below.
I am cutting this out on my silhouette, so I have my design. I'm not doing a full wrap. If you are nervous about lining up and ensuring your edges match, just give yourself two to three inches on one side and put someone's name or a cute little saying there. It saves you the trouble of getting the two ends to line up perfectly because we all know that is very difficult and doesn't always work. Once you get the shape tape on the cup, it does not want to come off. Just cut the edges off, then I measured, giving myself a couple of inches in the back. Then I can put a little fall saying.
You want to give yourself a room at the top and bottom. I drew a straight line on my cup and will stick shape tape on it. I peeled it and cut off some backing to stick it down without having all the rest peeled off.
I'm peeling the backing off and sticking it down simultaneously when my silhouette cuts this. Unfortunately, it cut a little too deep on the edges. You'll see where it went through the tape, but it ended okay. I just had to be careful around the edges.
I'm using ace high it's this gorgeous burgundy shade that is coming out in my wild west collection. It'll be coming out soon. I am so excited about it. There are so many gorgeous shades, but just going on with that, and then I like to kind of rub it around just making sure you get excellent glitter coverage. It's going to make sure you get a little piece of glitter stuck in every little nook and cranny of the shape tape so just keep doing that all the way around. I also used this as a small cut, and the other ones that I use are medium cut, so then taking a needle pen to peel off the little leaf parts. I did one line of one color, and the following line will be the other color.
I just go ahead and peel off everything on the cup that's going to be that color, making it more accessible. You're not going back and forth between glittering and peeling-off pieces. Just do the whole cup, whatever you're doing in that color. Now I'm using anaconda in a medium. This was from the tropical collection. It's a pretty deep green with shape tape. You also want to work from darkest to lightest color so that way. You don't have, like if you're using white, let's say. You use a darker color. You're not going to have little pieces of the darker color stuck in your white so just make sure you think about that when working with shape tape. Go from darkest to lightest, that exact thing. Just lay the glitter on and rub it in now. I'm doing all the rest of the leaves to do gold.
Then rolling in with gold fever is just this kind of light gold. This one is also from the wild west collection, which is like the shape tape. I used a clear matte spray paint to seal that. Then we're going in with glitter glue on the bottom to give the base some glitter. I'm just going along that center part, not the whole Bottom, so sprinkling on gold fever, I cut out this fall vibes decal. I got this color vinyl from Michael’s, and it's just the perfect fall color.
So putting that on the blank part of the cup in this vinyl matched perfectly with that gold glitter. It looked so pretty. Then I did two more layers of the epoxy to finish off the cup then it was done. I love the colors and how they turned out. You could do it instead of the dark green, something a little more contrast. You can see that pop a little more, but I just love how it turned out to let me know what you guys think in the comments, and make sure you check out my other fall videos. I'll see you at the next one bye.
Previous post
Stay Cozy Leopard Print Tumbler!
Next post
ALCOHOL INK BARNWOOD Tumbler Tutorial! Day 2 of 10 Days of Fall!
Related Posts

DiY Epoxy vs. Artistry Epoxy: What Happened to “Speedy Petey” and What’s the Best Epoxy for Tumblers & Art?
Why You Can’t Find “Speedy Petey” & What Replaced It If you’ve been Googling “Speedy Petey epoxy” and coming up empty, here’s the short...
Nov 06 2025

How Long Does It Take for Epoxy to Yellow (And How to Prevent or Fix It Like a Pro)
How Long Before Epoxy Resin Turns Yellow? One of the most common questions in the epoxy art and crafts world is: “How long before...
Jul 08 2025

Top Reasons Why Your Epoxy Is Sticky and How to Avoid Them
Whether you're designing a sparkling glitter tumbler, pouring a stunning river table, or experimenting with colorful resin art, few things are more disappointing than...
Jun 30 2025

Top 10 Epoxy Tumbler Ideas with Glitter, Pigments & More
Crafting epoxy tumblers is one of the most exciting and rewarding trends in the DIY world. Whether you're making a custom tumbler for personal...
Jun 25 2025

How to Mix Epoxy Resin Like a Pro: The Ultimate Guide for Tumbler Artists & DIY Crafters
Epoxy resin is a total game-changer for DIY crafters—especially tumbler makers who love that smooth, glass-like finish. But even the most creative designs can...
Jun 22 2025

BRIDAL Tumbler Tutorial using Shape Tape Double sided adhesive sheets!
Today, we're diving into a fun DIY project: creating a beautiful bride cup using a few of our favorite products, including shape tape, epoxy,...
May 17 2024

Is Artistry Epoxy good?
In the realm of DIY projects, home renovations, and artistic endeavors, epoxy resin has emerged as a versatile and captivating medium. Among the myriad...
Mar 27 2024