Christmas QUEEN Tumbler Tutorial!
https://youtu.be/9RPoWUQ9fZQ
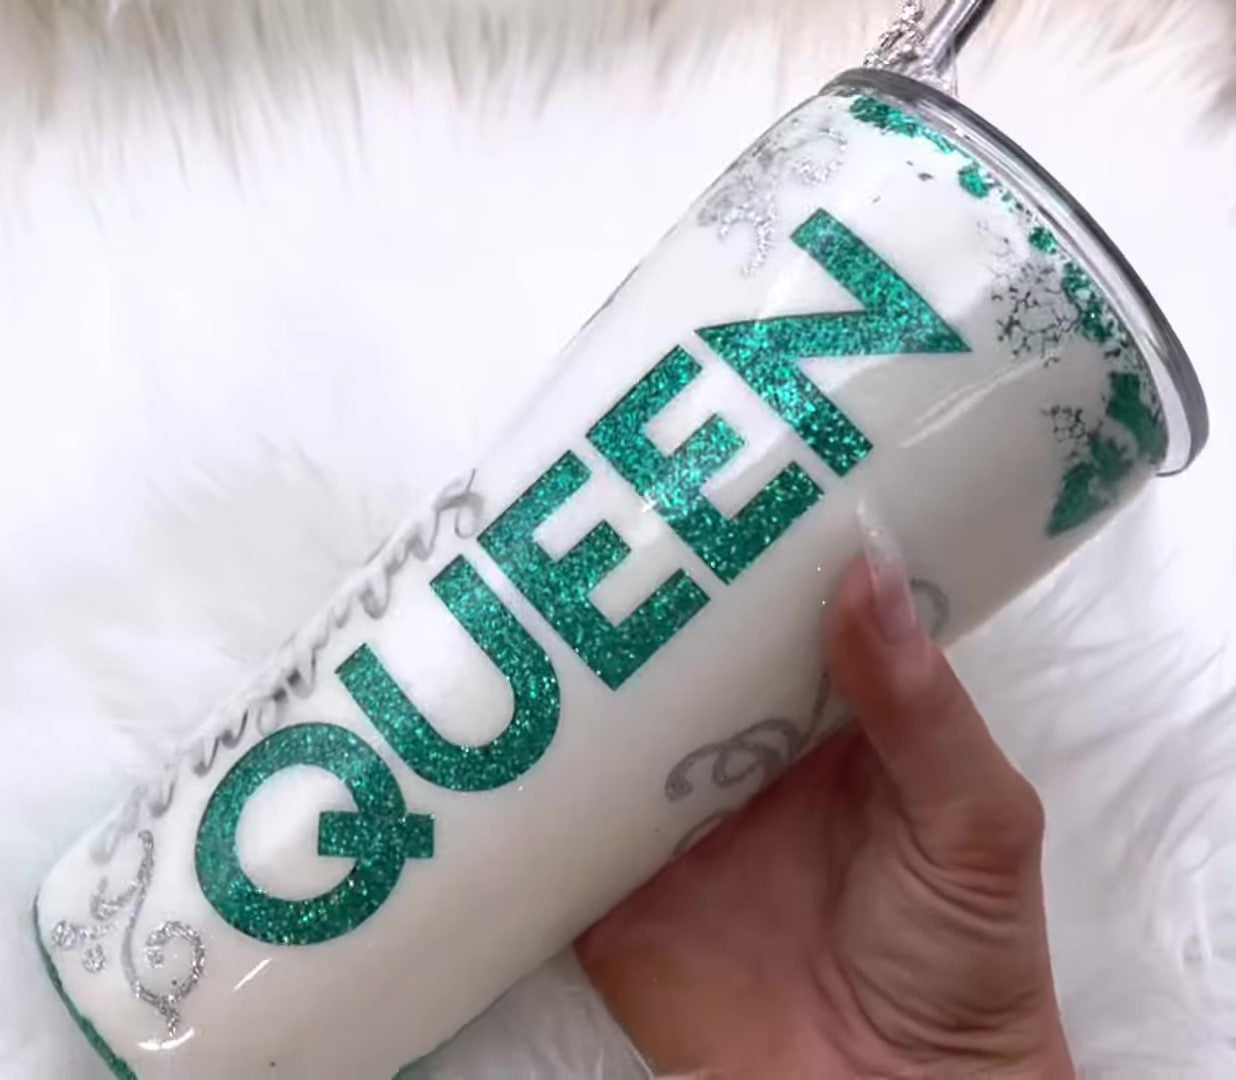
Hey guys, I thought I needed to do a tumbler for those of you that are Christmas fans. You know what I'm saying, like the ones that like to decorate for Christmas super early and buy Christmas stuff all year long, and it's like their thing, you know what I'm talking about? I think we all know one of those people, and this is for a Christmas queen. I had the idea to do a Tumbler that says Christmas queen, and it's all things Christmas. We have swirls and a Christmas tree. So much fun. I thought this was beautiful, and I even put a little crown on the straw like could you? I also did a little mistletoe on the bottom.
This is my salty glitter from the beach collection. I went with white, teal, and silver instead of your typical red and green Christmas. It would be nice to do something a little more elegant since it's a Christmas queen. If you guys know anybody that is a Christmas queen, I think she might need a tumbler like this in her life. Let's get into the tutorial.
I found this cup. I've never actually seen this brand before. Still, I loved the shape of it. The look of it, and I loved that it had a little teal piece on the lid since I wanted to do white and teal for this cup. So take off the package and the lid, then prep with mattify, and spray paint the same kind of teal shade I used in yesterday's video, the mint mug. Then once that was dry, I took off my artistry epoxy and spread a skinny layer all over the whole cup, then took salty from my beach collection and covered the entire cup with this glitter, which I believe is the medium.


 And once that was dry, I did the first layer of the artistry epoxy so we could hang out on the beach without Freezing. Yeah, isn't that amazing? So at Christmas, we'll be chilling and having a good and then doing another layer, and I did sand in, and we have an excellent smooth base. Once that was dry, I cut out this vinyl that says queen in more giant block letters. We will use this to do the peekaboo using my transfer tape to put it on my Cup.
We'll be channeling and having an excellent good time. Then I cut out this little mistletoe and a bottom tree with a star on top for the back of the car. Here we go. Next, I spray-painted white this is rust-ole flat white, and I think I did two or three even coats of this have a good time I think Santa's going to come and join us in this. Then, a good 10 to 20 minutes after I spray painted the last coat, I took the vinyl off to reveal our beautiful peekaboo.
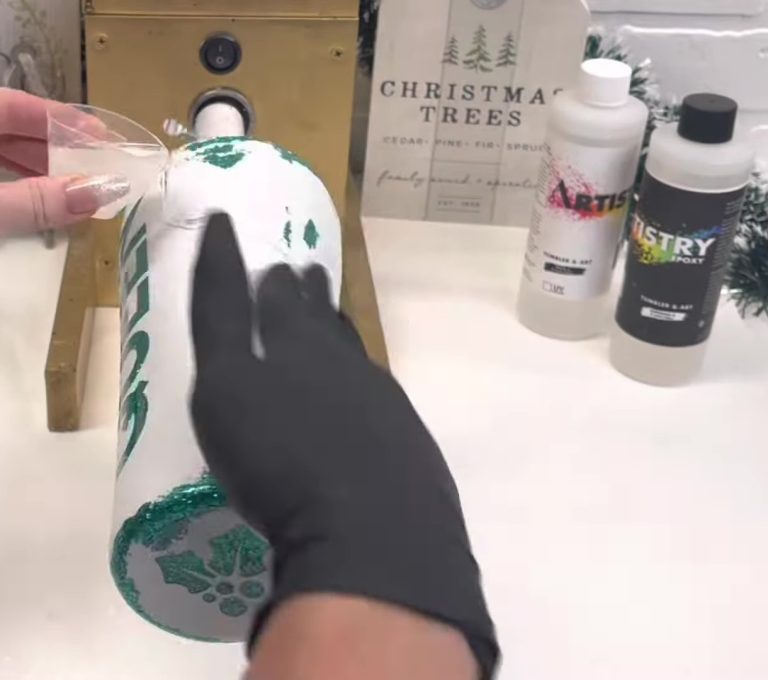
Then my next step was to distress it with me acetone pour it on a paper towel, and then rub, starting with the edges. You keep stroking until you see the glitter peeking through, and then keep going until you're happy with how it's looking when you do distress like this, I always like to go all the way around the top edge, the bottom edge, and then going up through the cup in a couple of spots. I feel like it adds character, but it's not too much. Then once I was done with that, I took a little more acetone and my q-tips and went in and cleaned it up.
And once that was dry, I did the first layer of the artistry epoxy so we could hang out on the beach without Freezing. Yeah, isn't that amazing? So at Christmas, we'll be chilling and having a good and then doing another layer, and I did sand in, and we have an excellent smooth base. Once that was dry, I cut out this vinyl that says queen in more giant block letters. We will use this to do the peekaboo using my transfer tape to put it on my Cup.
We'll be channeling and having an excellent good time. Then I cut out this little mistletoe and a bottom tree with a star on top for the back of the car. Here we go. Next, I spray-painted white this is rust-ole flat white, and I think I did two or three even coats of this have a good time I think Santa's going to come and join us in this. Then, a good 10 to 20 minutes after I spray painted the last coat, I took the vinyl off to reveal our beautiful peekaboo.
Then my next step was to distress it with me acetone pour it on a paper towel, and then rub, starting with the edges. You keep stroking until you see the glitter peeking through, and then keep going until you're happy with how it's looking when you do distress like this, I always like to go all the way around the top edge, the bottom edge, and then going up through the cup in a couple of spots. I feel like it adds character, but it's not too much. Then once I was done with that, I took a little more acetone and my q-tips and went in and cleaned it up.


 The epoxy can look cloudy with the paint residue on where you want to go. You can see how much shinier it gets after this. Go through your entire cup, wherever you have the peekaboo or distressing, and make sure all of it is looking nice. Then I cut out the word Christmas in silver vinyl because this is our queen. So we had to add Christmas.
And I did a more cursive font because I thought it would look nice with the more giant block letters for a queen. So then I had these stickers, my stars, snowflakes, and these swirly glittery ones. I was not sure what I was doing with this cup at this point, but these stickers saved the day. These are beautiful; I'm pretty sure they're from Michael's, and I'm going to go back and get more and see if they have different colors because these were much fun to use. They lay completely flat they look fantastic.
They were perfect under the epoxy. So I'm definitely going to look into it to see if they have other designs, colors, or anything, or I might even look up this brand online and buy all of it. These stickers are that good going through, and adding these swirls throughout the cup here and there to add swirly Christmassy details in my heart, I wouldn't miss this. So that's what we do. We'll be chilling and having a good good time. Then on the Christmas tree, there were small round, different sizes on these glitter sheets, and I was like, okay, those are perfect ornaments adding those.
The epoxy can look cloudy with the paint residue on where you want to go. You can see how much shinier it gets after this. Go through your entire cup, wherever you have the peekaboo or distressing, and make sure all of it is looking nice. Then I cut out the word Christmas in silver vinyl because this is our queen. So we had to add Christmas.
And I did a more cursive font because I thought it would look nice with the more giant block letters for a queen. So then I had these stickers, my stars, snowflakes, and these swirly glittery ones. I was not sure what I was doing with this cup at this point, but these stickers saved the day. These are beautiful; I'm pretty sure they're from Michael's, and I'm going to go back and get more and see if they have different colors because these were much fun to use. They lay completely flat they look fantastic.
They were perfect under the epoxy. So I'm definitely going to look into it to see if they have other designs, colors, or anything, or I might even look up this brand online and buy all of it. These stickers are that good going through, and adding these swirls throughout the cup here and there to add swirly Christmassy details in my heart, I wouldn't miss this. So that's what we do. We'll be chilling and having a good good time. Then on the Christmas tree, there were small round, different sizes on these glitter sheets, and I was like, okay, those are perfect ornaments adding those.


 I added sticker jewel stars, which fit perfectly on my little tree. Then add another layer of epoxy, and I said a little filter. Come and join us. Now let's package it. I have my cup. I found this beautiful silver and white tissue paper.
I found this cute little stocking. It was silver and white. You could always throw a gift card or a little piece of jewelry in there, then look at this sign. This girl loves Christmas with leopard print. This is from hobby lobby. I thought that would be perfect for this gift. Next, I found this beautiful makeup palette that matches perfectly, and for a final touch, I found these little crowns. How cute are they? I think they're napkin rings from hobby lobby.
Then I found this sparkly silver box that I thought would be perfect doing my tissue paper. So then, my pretty silver and white tissue paper added my cups, the makeup palette, the little sign, the little stocking, the little crown, and a little piece of tape. It stayed put, and that is it. I think it's such a pretty little gift. Thank you, guys.
I added sticker jewel stars, which fit perfectly on my little tree. Then add another layer of epoxy, and I said a little filter. Come and join us. Now let's package it. I have my cup. I found this beautiful silver and white tissue paper.
I found this cute little stocking. It was silver and white. You could always throw a gift card or a little piece of jewelry in there, then look at this sign. This girl loves Christmas with leopard print. This is from hobby lobby. I thought that would be perfect for this gift. Next, I found this beautiful makeup palette that matches perfectly, and for a final touch, I found these little crowns. How cute are they? I think they're napkin rings from hobby lobby.
Then I found this sparkly silver box that I thought would be perfect doing my tissue paper. So then, my pretty silver and white tissue paper added my cups, the makeup palette, the little sign, the little stocking, the little crown, and a little piece of tape. It stayed put, and that is it. I think it's such a pretty little gift. Thank you, guys.
And once that was dry, I did the first layer of the artistry epoxy so we could hang out on the beach without Freezing. Yeah, isn't that amazing? So at Christmas, we'll be chilling and having a good and then doing another layer, and I did sand in, and we have an excellent smooth base. Once that was dry, I cut out this vinyl that says queen in more giant block letters. We will use this to do the peekaboo using my transfer tape to put it on my Cup.
We'll be channeling and having an excellent good time. Then I cut out this little mistletoe and a bottom tree with a star on top for the back of the car. Here we go. Next, I spray-painted white this is rust-ole flat white, and I think I did two or three even coats of this have a good time I think Santa's going to come and join us in this. Then, a good 10 to 20 minutes after I spray painted the last coat, I took the vinyl off to reveal our beautiful peekaboo.
Then my next step was to distress it with me acetone pour it on a paper towel, and then rub, starting with the edges. You keep stroking until you see the glitter peeking through, and then keep going until you're happy with how it's looking when you do distress like this, I always like to go all the way around the top edge, the bottom edge, and then going up through the cup in a couple of spots. I feel like it adds character, but it's not too much. Then once I was done with that, I took a little more acetone and my q-tips and went in and cleaned it up.
The epoxy can look cloudy with the paint residue on where you want to go. You can see how much shinier it gets after this. Go through your entire cup, wherever you have the peekaboo or distressing, and make sure all of it is looking nice. Then I cut out the word Christmas in silver vinyl because this is our queen. So we had to add Christmas.
And I did a more cursive font because I thought it would look nice with the more giant block letters for a queen. So then I had these stickers, my stars, snowflakes, and these swirly glittery ones. I was not sure what I was doing with this cup at this point, but these stickers saved the day. These are beautiful; I'm pretty sure they're from Michael's, and I'm going to go back and get more and see if they have different colors because these were much fun to use. They lay completely flat they look fantastic.
They were perfect under the epoxy. So I'm definitely going to look into it to see if they have other designs, colors, or anything, or I might even look up this brand online and buy all of it. These stickers are that good going through, and adding these swirls throughout the cup here and there to add swirly Christmassy details in my heart, I wouldn't miss this. So that's what we do. We'll be chilling and having a good good time. Then on the Christmas tree, there were small round, different sizes on these glitter sheets, and I was like, okay, those are perfect ornaments adding those.
I added sticker jewel stars, which fit perfectly on my little tree. Then add another layer of epoxy, and I said a little filter. Come and join us. Now let's package it. I have my cup. I found this beautiful silver and white tissue paper.
I found this cute little stocking. It was silver and white. You could always throw a gift card or a little piece of jewelry in there, then look at this sign. This girl loves Christmas with leopard print. This is from hobby lobby. I thought that would be perfect for this gift. Next, I found this beautiful makeup palette that matches perfectly, and for a final touch, I found these little crowns. How cute are they? I think they're napkin rings from hobby lobby.
Then I found this sparkly silver box that I thought would be perfect doing my tissue paper. So then, my pretty silver and white tissue paper added my cups, the makeup palette, the little sign, the little stocking, the little crown, and a little piece of tape. It stayed put, and that is it. I think it's such a pretty little gift. Thank you, guys.
Related Posts

DiY Epoxy vs. Artistry Epoxy: What Happened to “Speedy Petey” and What’s the Best Epoxy for Tumblers & Art?
Why You Can’t Find “Speedy Petey” & What Replaced It If you’ve been Googling “Speedy Petey epoxy” and coming up empty, here’s the short...
Nov 06 2025

How Long Does It Take for Epoxy to Yellow (And How to Prevent or Fix It Like a Pro)
How Long Before Epoxy Resin Turns Yellow? One of the most common questions in the epoxy art and crafts world is: “How long before...
Jul 08 2025

Top Reasons Why Your Epoxy Is Sticky and How to Avoid Them
Whether you're designing a sparkling glitter tumbler, pouring a stunning river table, or experimenting with colorful resin art, few things are more disappointing than...
Jun 30 2025

Top 10 Epoxy Tumbler Ideas with Glitter, Pigments & More
Crafting epoxy tumblers is one of the most exciting and rewarding trends in the DIY world. Whether you're making a custom tumbler for personal...
Jun 25 2025

How to Mix Epoxy Resin Like a Pro: The Ultimate Guide for Tumbler Artists & DIY Crafters
Epoxy resin is a total game-changer for DIY crafters—especially tumbler makers who love that smooth, glass-like finish. But even the most creative designs can...
Jun 22 2025

BRIDAL Tumbler Tutorial using Shape Tape Double sided adhesive sheets!
Today, we're diving into a fun DIY project: creating a beautiful bride cup using a few of our favorite products, including shape tape, epoxy,...
May 17 2024

Is Artistry Epoxy good?
In the realm of DIY projects, home renovations, and artistic endeavors, epoxy resin has emerged as a versatile and captivating medium. Among the myriad...
Mar 27 2024