FAUX-CERAMIC POTTERY MUG Tumbler Tutorial! Day 5 of 10 Days of Fall!
https://youtu.be/N-aMTpC7ZzI
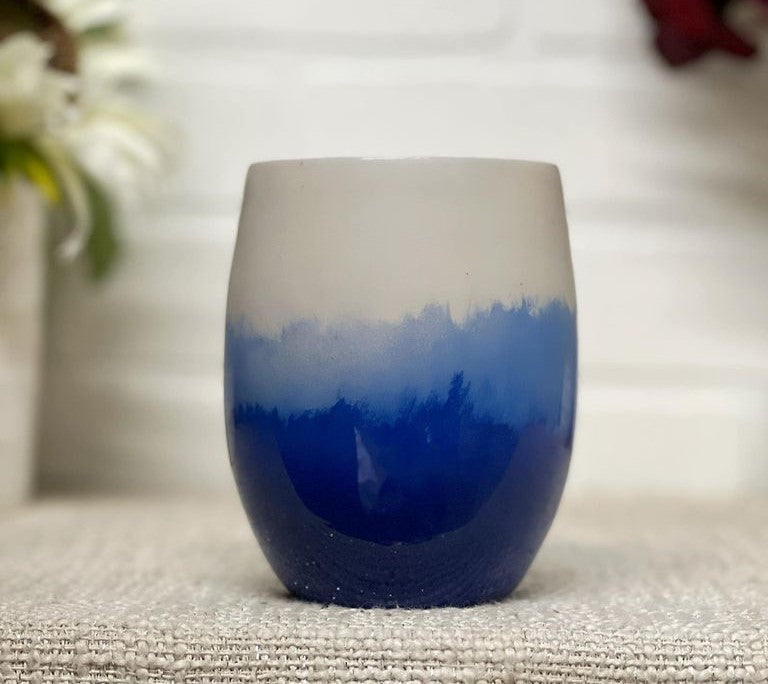
Hello everyone, welcome to day five of my 10 days of fall. Today is this ceramic-look mug. It's a bigger size, but my idea was to mimic a ceramic pottery piece with how they do the glaze. So that's what I did on this cup.
Wine glass glassing off the lid and the stickers I also take off the bottom like rubber. The part was then prepped with matte and a red pad, and once that was dry, I went in with Rust-Oleum's, the ombréing the use of anything black. So then we move on to color fixation in taupe. This is one of our three-in-one paints, but today I'm just using it as paint, not as a glitter adhesive. I'm using one of our brushes. This is a large brush. It's a makeup brush. It's a fluffy brush. And it just puts this paint on so lovely and smooth. So just do a full coverage of the taupe paint. I'm taking this Wildflower Blue from Rust-Oleum, which is such a gorgeous color, and I'm painting the bottom half but I'm kind of ombring it towards the top. I kind of just want it to fade as it goes up.


 We don't want the paint, so just take a paper towel and rub off the extra paint at the top. You can see how it ombres up the cup. I'm not wiping in a completely straight line. It kind of looks a little jaggedy. I think that looks like the glaze they use on pottery, just how it's not a perfect line. I don't know if that's how it is in my head, I don't know how close it is, but I just thought it looked cool. So then we go on with another layer of epoxy to do that whole process again with a different color. If you tried it right now, you couldn't get it further down without taking off the lighter blue, so this is a darker blue.
You could use any color with this, but I've seen a lot of pottery ceramic pieces where they just do two different colors or two different tones of the same color, so I wanted to do a lighter blue and a darker blue—the same concept. You're spraying it towards the top, angling it, but we'll keep it lower on the cup this time.
We don't want the paint, so just take a paper towel and rub off the extra paint at the top. You can see how it ombres up the cup. I'm not wiping in a completely straight line. It kind of looks a little jaggedy. I think that looks like the glaze they use on pottery, just how it's not a perfect line. I don't know if that's how it is in my head, I don't know how close it is, but I just thought it looked cool. So then we go on with another layer of epoxy to do that whole process again with a different color. If you tried it right now, you couldn't get it further down without taking off the lighter blue, so this is a darker blue.
You could use any color with this, but I've seen a lot of pottery ceramic pieces where they just do two different colors or two different tones of the same color, so I wanted to do a lighter blue and a darker blue—the same concept. You're spraying it towards the top, angling it, but we'll keep it lower on the cup this time.


 With the acetone, we're removing further down so that the darker blue is less of the cup, and you can still see the lighter blue. Because we have that layer of epoxy in between, you're not removing any of the lighter blues, so just keep going with that until you like how it looks.
So that is where I ended it. I was happy with that. So then a final layer of epoxy to finish off this cup. Once the epoxy is cured, I'm going to make it matte on the top by mattifying. I'm using a non-abrasive pad. This is our white one. You could also use steel wool with the four zeros, but I'm just making circular motions, and I'm keeping it up on that taupe part. You don't need to tape it off or anything.
With the acetone, we're removing further down so that the darker blue is less of the cup, and you can still see the lighter blue. Because we have that layer of epoxy in between, you're not removing any of the lighter blues, so just keep going with that until you like how it looks.
So that is where I ended it. I was happy with that. So then a final layer of epoxy to finish off this cup. Once the epoxy is cured, I'm going to make it matte on the top by mattifying. I'm using a non-abrasive pad. This is our white one. You could also use steel wool with the four zeros, but I'm just making circular motions, and I'm keeping it up on that taupe part. You don't need to tape it off or anything.


 It's not going to be a harsh line where the mat is, and that's fine. It gives a matte effect on the top, and then the bottom stays glossy. So it does look more like ceramic pottery without the lid, but it's still a beautiful cup. That's all for this video. Thank you so much for watching. Bye!
We don't want the paint, so just take a paper towel and rub off the extra paint at the top. You can see how it ombres up the cup. I'm not wiping in a completely straight line. It kind of looks a little jaggedy. I think that looks like the glaze they use on pottery, just how it's not a perfect line. I don't know if that's how it is in my head, I don't know how close it is, but I just thought it looked cool. So then we go on with another layer of epoxy to do that whole process again with a different color. If you tried it right now, you couldn't get it further down without taking off the lighter blue, so this is a darker blue.
You could use any color with this, but I've seen a lot of pottery ceramic pieces where they just do two different colors or two different tones of the same color, so I wanted to do a lighter blue and a darker blue—the same concept. You're spraying it towards the top, angling it, but we'll keep it lower on the cup this time.
With the acetone, we're removing further down so that the darker blue is less of the cup, and you can still see the lighter blue. Because we have that layer of epoxy in between, you're not removing any of the lighter blues, so just keep going with that until you like how it looks.
So that is where I ended it. I was happy with that. So then a final layer of epoxy to finish off this cup. Once the epoxy is cured, I'm going to make it matte on the top by mattifying. I'm using a non-abrasive pad. This is our white one. You could also use steel wool with the four zeros, but I'm just making circular motions, and I'm keeping it up on that taupe part. You don't need to tape it off or anything.
It's not going to be a harsh line where the mat is, and that's fine. It gives a matte effect on the top, and then the bottom stays glossy. So it does look more like ceramic pottery without the lid, but it's still a beautiful cup. That's all for this video. Thank you so much for watching. Bye!
Previous post
INVERTED SPLIT Hello Fall Tumbler Tutorial! Day 4 of 10 Days of Fall!
Next post
FALL BRIDE BLUSH MATTE FINISH Tumbler Tutorial! Day 6 of 10 Days of Fall!
Related Posts

DiY Epoxy vs. Artistry Epoxy: What Happened to “Speedy Petey” and What’s the Best Epoxy for Tumblers & Art?
Why You Can’t Find “Speedy Petey” & What Replaced It If you’ve been Googling “Speedy Petey epoxy” and coming up empty, here’s the short...
Nov 06 2025

How Long Does It Take for Epoxy to Yellow (And How to Prevent or Fix It Like a Pro)
How Long Before Epoxy Resin Turns Yellow? One of the most common questions in the epoxy art and crafts world is: “How long before...
Jul 08 2025

Top Reasons Why Your Epoxy Is Sticky and How to Avoid Them
Whether you're designing a sparkling glitter tumbler, pouring a stunning river table, or experimenting with colorful resin art, few things are more disappointing than...
Jun 30 2025

Top 10 Epoxy Tumbler Ideas with Glitter, Pigments & More
Crafting epoxy tumblers is one of the most exciting and rewarding trends in the DIY world. Whether you're making a custom tumbler for personal...
Jun 25 2025

How to Mix Epoxy Resin Like a Pro: The Ultimate Guide for Tumbler Artists & DIY Crafters
Epoxy resin is a total game-changer for DIY crafters—especially tumbler makers who love that smooth, glass-like finish. But even the most creative designs can...
Jun 22 2025

BRIDAL Tumbler Tutorial using Shape Tape Double sided adhesive sheets!
Today, we're diving into a fun DIY project: creating a beautiful bride cup using a few of our favorite products, including shape tape, epoxy,...
May 17 2024

Is Artistry Epoxy good?
In the realm of DIY projects, home renovations, and artistic endeavors, epoxy resin has emerged as a versatile and captivating medium. Among the myriad...
Mar 27 2024