INVERTED SPLIT Hello Fall Tumbler Tutorial! Day 4 of 10 Days of Fall!
https://youtu.be/mGnGRY50kEU
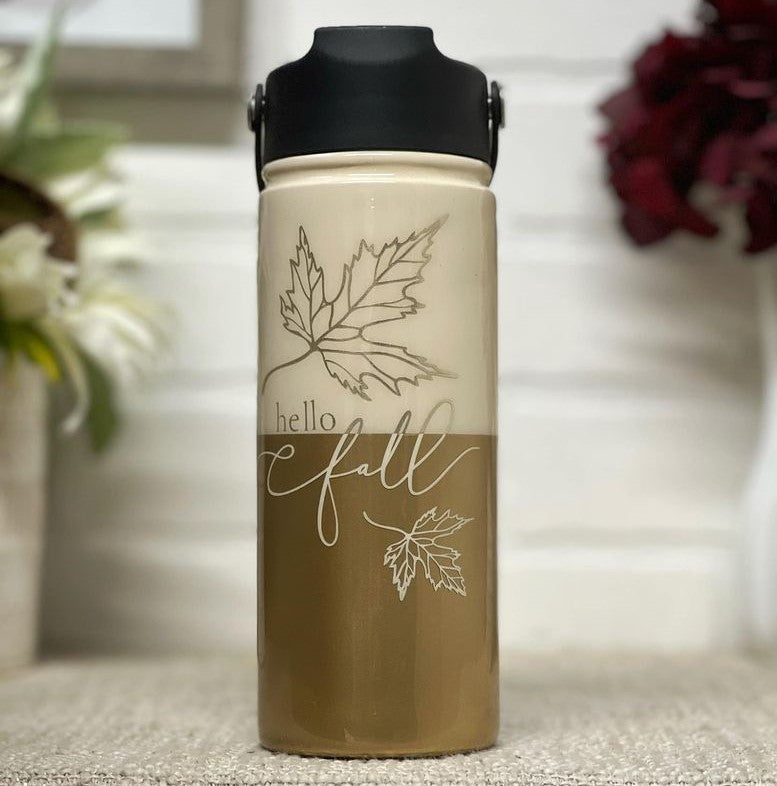
Hey, guys, welcome to day four of my 10 days of fall. Today I have this beautiful Hello Fall kind of split cup. I love this, it's very different. I haven't seen anything like this, so I love this cup. I was going in a completely different direction, if I'm being honest. The idea was to have gold on the bottom and kind of come out, almost like a gold face with flowers, but I got the wrong type of water slide paper or something. So it was not looking good, so I'm glad that my original design did not work out because now I have this, and it has the kind of water bottle straw top that I like and a handle, so I wanted to make it this cut matte. I feel like I already have too many mac cups in my fall cups, so I think this would look amazing with a matte finish. If you wanted to do this and make it matte, you definitely could, and it would look good, but yes, I just left it shiny. I might make it matte after this video, but I'm okay. I found this design on Etsy. I will link it below for you guys. Don't forget to tune in for day four tomorrow, and let's get into the tutorial.


 I'm starting with this hydro-flow hybrid water bottle cup. This was at Ross for $9.99. I just love the straw tops. I don't know what it is with the push-up straw lid, but that's something that I like to carry around instead of the kinds of regular lids with a straw in them. I'm also taking off the packaging, and then we'll prep by mattifying in a maroon abrasive pad. Once that was dry, I used ivory silk rust-ileum paint. I also taped it off. So the top rims are some white electrical tape, which is why you can't see it. Still, I did the video that off, and this is just a beautiful ivory color to use as our base, so then taking some blue painter's tape.
I used a pen and a candle to the kind of make my line straight, so that way I made the tape line straight. So then, putting my tape on, you can see I have a nice straight line thanks to the pen mark. I do have an excellent fantastic tool that I just got in the mail to make straight lines, so next time I need to do this, I will be using that superb tool. I'm using some metallic gold just to paint that bottom section, and I'm angling the spray paint away from the bottom or towards the bottom, so I don't get any color on the top section.
I'm starting with this hydro-flow hybrid water bottle cup. This was at Ross for $9.99. I just love the straw tops. I don't know what it is with the push-up straw lid, but that's something that I like to carry around instead of the kinds of regular lids with a straw in them. I'm also taking off the packaging, and then we'll prep by mattifying in a maroon abrasive pad. Once that was dry, I used ivory silk rust-ileum paint. I also taped it off. So the top rims are some white electrical tape, which is why you can't see it. Still, I did the video that off, and this is just a beautiful ivory color to use as our base, so then taking some blue painter's tape.
I used a pen and a candle to the kind of make my line straight, so that way I made the tape line straight. So then, putting my tape on, you can see I have a nice straight line thanks to the pen mark. I do have an excellent fantastic tool that I just got in the mail to make straight lines, so next time I need to do this, I will be using that superb tool. I'm using some metallic gold just to paint that bottom section, and I'm angling the spray paint away from the bottom or towards the bottom, so I don't get any color on the top section.


 Then, after just peeling off that tape, it was time for our first layer of epoxy. It's artistry, a one-to-one facet. It's my favorite. I just add a nice smooth layer and gently get on that top rim, so it doesn't glob up there, but we want epoxy. I found some matching vinyl, a gold one that's pretty similar to the gold paint, so I stacked them on top of each other and taped them together, and I kind of held them up to the light to make sure I was curing this, so you know where to put your decal. I've recently started doing this, and it's a game changer if you don't do it. You should, but just line it up with the line there; I couldn't get this gold off.


 I don't know what it was about this vinyl, but it did not want to stick, so I lined it up on the exact line, matched the other letters, and removed the tape. I think it's pretty simple, but it looks nice, and you could do it with any type of design. It's kind of just like an inverted look. It was like an inverted split look, which is how it turned out. I think it's simple and beautiful and significantly falls without being too over the top. It's just more subtle, and I think it's gorgeous. Let me know if you like it in the comments. And make sure you check out my other fall videos. I'll see you at the next video. Bye!
I'm starting with this hydro-flow hybrid water bottle cup. This was at Ross for $9.99. I just love the straw tops. I don't know what it is with the push-up straw lid, but that's something that I like to carry around instead of the kinds of regular lids with a straw in them. I'm also taking off the packaging, and then we'll prep by mattifying in a maroon abrasive pad. Once that was dry, I used ivory silk rust-ileum paint. I also taped it off. So the top rims are some white electrical tape, which is why you can't see it. Still, I did the video that off, and this is just a beautiful ivory color to use as our base, so then taking some blue painter's tape.
I used a pen and a candle to the kind of make my line straight, so that way I made the tape line straight. So then, putting my tape on, you can see I have a nice straight line thanks to the pen mark. I do have an excellent fantastic tool that I just got in the mail to make straight lines, so next time I need to do this, I will be using that superb tool. I'm using some metallic gold just to paint that bottom section, and I'm angling the spray paint away from the bottom or towards the bottom, so I don't get any color on the top section.
Then, after just peeling off that tape, it was time for our first layer of epoxy. It's artistry, a one-to-one facet. It's my favorite. I just add a nice smooth layer and gently get on that top rim, so it doesn't glob up there, but we want epoxy. I found some matching vinyl, a gold one that's pretty similar to the gold paint, so I stacked them on top of each other and taped them together, and I kind of held them up to the light to make sure I was curing this, so you know where to put your decal. I've recently started doing this, and it's a game changer if you don't do it. You should, but just line it up with the line there; I couldn't get this gold off.
I don't know what it was about this vinyl, but it did not want to stick, so I lined it up on the exact line, matched the other letters, and removed the tape. I think it's pretty simple, but it looks nice, and you could do it with any type of design. It's kind of just like an inverted look. It was like an inverted split look, which is how it turned out. I think it's simple and beautiful and significantly falls without being too over the top. It's just more subtle, and I think it's gorgeous. Let me know if you like it in the comments. And make sure you check out my other fall videos. I'll see you at the next video. Bye!
Previous post
COPPER AND BLUES Glitter and Foil Flakes Tumbler Tutorial! Day 3rd of 10 Days of Fall!
Next post
FAUX-CERAMIC POTTERY MUG Tumbler Tutorial! Day 5 of 10 Days of Fall!
Related Posts

DiY Epoxy vs. Artistry Epoxy: What Happened to “Speedy Petey” and What’s the Best Epoxy for Tumblers & Art?
Why You Can’t Find “Speedy Petey” & What Replaced It If you’ve been Googling “Speedy Petey epoxy” and coming up empty, here’s the short...
Nov 06 2025

How Long Does It Take for Epoxy to Yellow (And How to Prevent or Fix It Like a Pro)
How Long Before Epoxy Resin Turns Yellow? One of the most common questions in the epoxy art and crafts world is: “How long before...
Jul 08 2025

Top Reasons Why Your Epoxy Is Sticky and How to Avoid Them
Whether you're designing a sparkling glitter tumbler, pouring a stunning river table, or experimenting with colorful resin art, few things are more disappointing than...
Jun 30 2025

Top 10 Epoxy Tumbler Ideas with Glitter, Pigments & More
Crafting epoxy tumblers is one of the most exciting and rewarding trends in the DIY world. Whether you're making a custom tumbler for personal...
Jun 25 2025

How to Mix Epoxy Resin Like a Pro: The Ultimate Guide for Tumbler Artists & DIY Crafters
Epoxy resin is a total game-changer for DIY crafters—especially tumbler makers who love that smooth, glass-like finish. But even the most creative designs can...
Jun 22 2025

BRIDAL Tumbler Tutorial using Shape Tape Double sided adhesive sheets!
Today, we're diving into a fun DIY project: creating a beautiful bride cup using a few of our favorite products, including shape tape, epoxy,...
May 17 2024

Is Artistry Epoxy good?
In the realm of DIY projects, home renovations, and artistic endeavors, epoxy resin has emerged as a versatile and captivating medium. Among the myriad...
Mar 27 2024