FOIL LEOPARD AND GOLD MUG Tumbler Tutorial! Day 7th 10 Days of Fall!
https://youtu.be/9WI793uV8W0
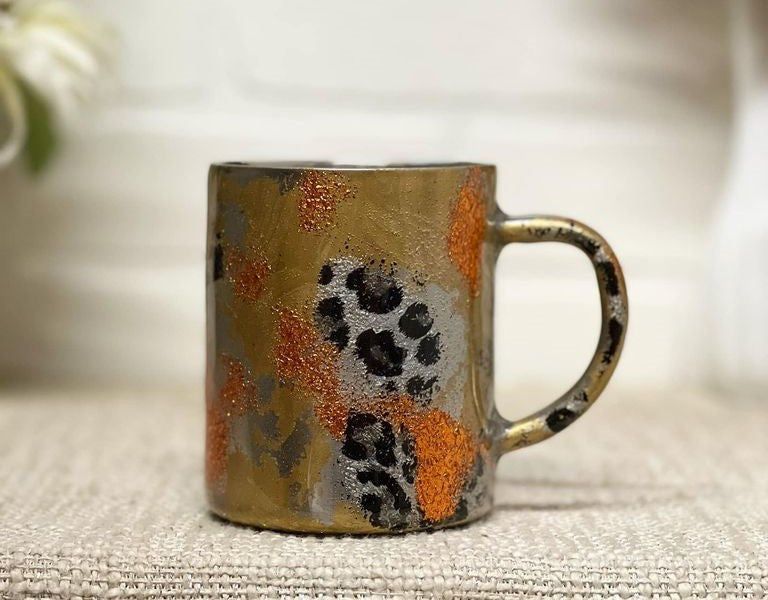
Hey guys, welcome to day seven of my 10 days of fall. Today we have the cutest little mug. I just love how this turned out. These mugs are, uh, stainless steel. I did get this from Amazon quite a while ago. It's just a mug by itself. It doesn't have a lid, but I know many stainless cup places have mugs like this with the top and everything. I will link to these down below, but this one is just from Amazon by itself. This one is just from Amazon by itself.
I love the distressed look of it. I love the tiny animal print in colors, and it's very fall. So don't forget to come back for day eight tomorrow, and let's get into the tutorial. So starting with a stainless steel mug I got from Amazon, it was nice and clean, so I just prepped it with mattify and an abrasive pad.


 I'm ripping it off. It's not working so well with the leopard, and the other was not working. It was peeling off the glue. I don't know if I'm doing something wrong. I kept trying, but it just was not working. I've heard of people doing two layers of the glue, so I went ahead and added a second layer and let that dry as well. Then, once that was dry, I went back in with the foil and kept it, and I don't know what it was about the burgundy and gold or the burgundy foil. It just did not want to work. The leopard one was doing pretty well with the two layers, so I peeled it all off.


 And it took some of the gold with it. I just used this Gorilla Glue spray adhesive. I said, "Let me try this." I don't know if it'll work, but I'll just use it because I was done. " I was like, "This isn't working." You can do like a kind of sponge painting the gold on to get that kind of random look that it has. " Then I let that dry a little bit till it was tacky, and I went in with the foil. It worked better than anything else I've tried, except for this burgundy one. I just really wanted this to be distressed, I don't know, mainly distressed and have pops of color in the leopard, so I kept going until I was happy with it. Then it was time for epoxy. I did two layers of our Artistry one-to-one fast set.


 I love how it turned out. I love all of the distressing, and even though you can see random glue spots and weird things, I don't even know if I just think it looks so cool. It just adds to the distressed look. I love it. Let me know what you think in the comments. Also, don't forget to check out my other fall videos, and I will see you at the next one. Thank you so much for watching. Bye!
I'm ripping it off. It's not working so well with the leopard, and the other was not working. It was peeling off the glue. I don't know if I'm doing something wrong. I kept trying, but it just was not working. I've heard of people doing two layers of the glue, so I went ahead and added a second layer and let that dry as well. Then, once that was dry, I went back in with the foil and kept it, and I don't know what it was about the burgundy and gold or the burgundy foil. It just did not want to work. The leopard one was doing pretty well with the two layers, so I peeled it all off.
And it took some of the gold with it. I just used this Gorilla Glue spray adhesive. I said, "Let me try this." I don't know if it'll work, but I'll just use it because I was done. " I was like, "This isn't working." You can do like a kind of sponge painting the gold on to get that kind of random look that it has. " Then I let that dry a little bit till it was tacky, and I went in with the foil. It worked better than anything else I've tried, except for this burgundy one. I just really wanted this to be distressed, I don't know, mainly distressed and have pops of color in the leopard, so I kept going until I was happy with it. Then it was time for epoxy. I did two layers of our Artistry one-to-one fast set.
I love how it turned out. I love all of the distressing, and even though you can see random glue spots and weird things, I don't even know if I just think it looks so cool. It just adds to the distressed look. I love it. Let me know what you think in the comments. Also, don't forget to check out my other fall videos, and I will see you at the next one. Thank you so much for watching. Bye!
Previous post
FALL BRIDE BLUSH MATTE FINISH Tumbler Tutorial! Day 6 of 10 Days of Fall!
Next post
GLITTER GEODE MATTE FINISH Tumbler Tutorial! Day 8 of 10 Days of Fall!
Related Posts

DiY Epoxy vs. Artistry Epoxy: What Happened to “Speedy Petey” and What’s the Best Epoxy for Tumblers & Art?
Why You Can’t Find “Speedy Petey” & What Replaced It If you’ve been Googling “Speedy Petey epoxy” and coming up empty, here’s the short...
Nov 06 2025

How Long Does It Take for Epoxy to Yellow (And How to Prevent or Fix It Like a Pro)
How Long Before Epoxy Resin Turns Yellow? One of the most common questions in the epoxy art and crafts world is: “How long before...
Jul 08 2025

Top Reasons Why Your Epoxy Is Sticky and How to Avoid Them
Whether you're designing a sparkling glitter tumbler, pouring a stunning river table, or experimenting with colorful resin art, few things are more disappointing than...
Jun 30 2025

Top 10 Epoxy Tumbler Ideas with Glitter, Pigments & More
Crafting epoxy tumblers is one of the most exciting and rewarding trends in the DIY world. Whether you're making a custom tumbler for personal...
Jun 25 2025

How to Mix Epoxy Resin Like a Pro: The Ultimate Guide for Tumbler Artists & DIY Crafters
Epoxy resin is a total game-changer for DIY crafters—especially tumbler makers who love that smooth, glass-like finish. But even the most creative designs can...
Jun 22 2025

BRIDAL Tumbler Tutorial using Shape Tape Double sided adhesive sheets!
Today, we're diving into a fun DIY project: creating a beautiful bride cup using a few of our favorite products, including shape tape, epoxy,...
May 17 2024

Is Artistry Epoxy good?
In the realm of DIY projects, home renovations, and artistic endeavors, epoxy resin has emerged as a versatile and captivating medium. Among the myriad...
Mar 27 2024