GLITTER GEODE MATTE FINISH Tumbler Tutorial! Day 8 of 10 Days of Fall!
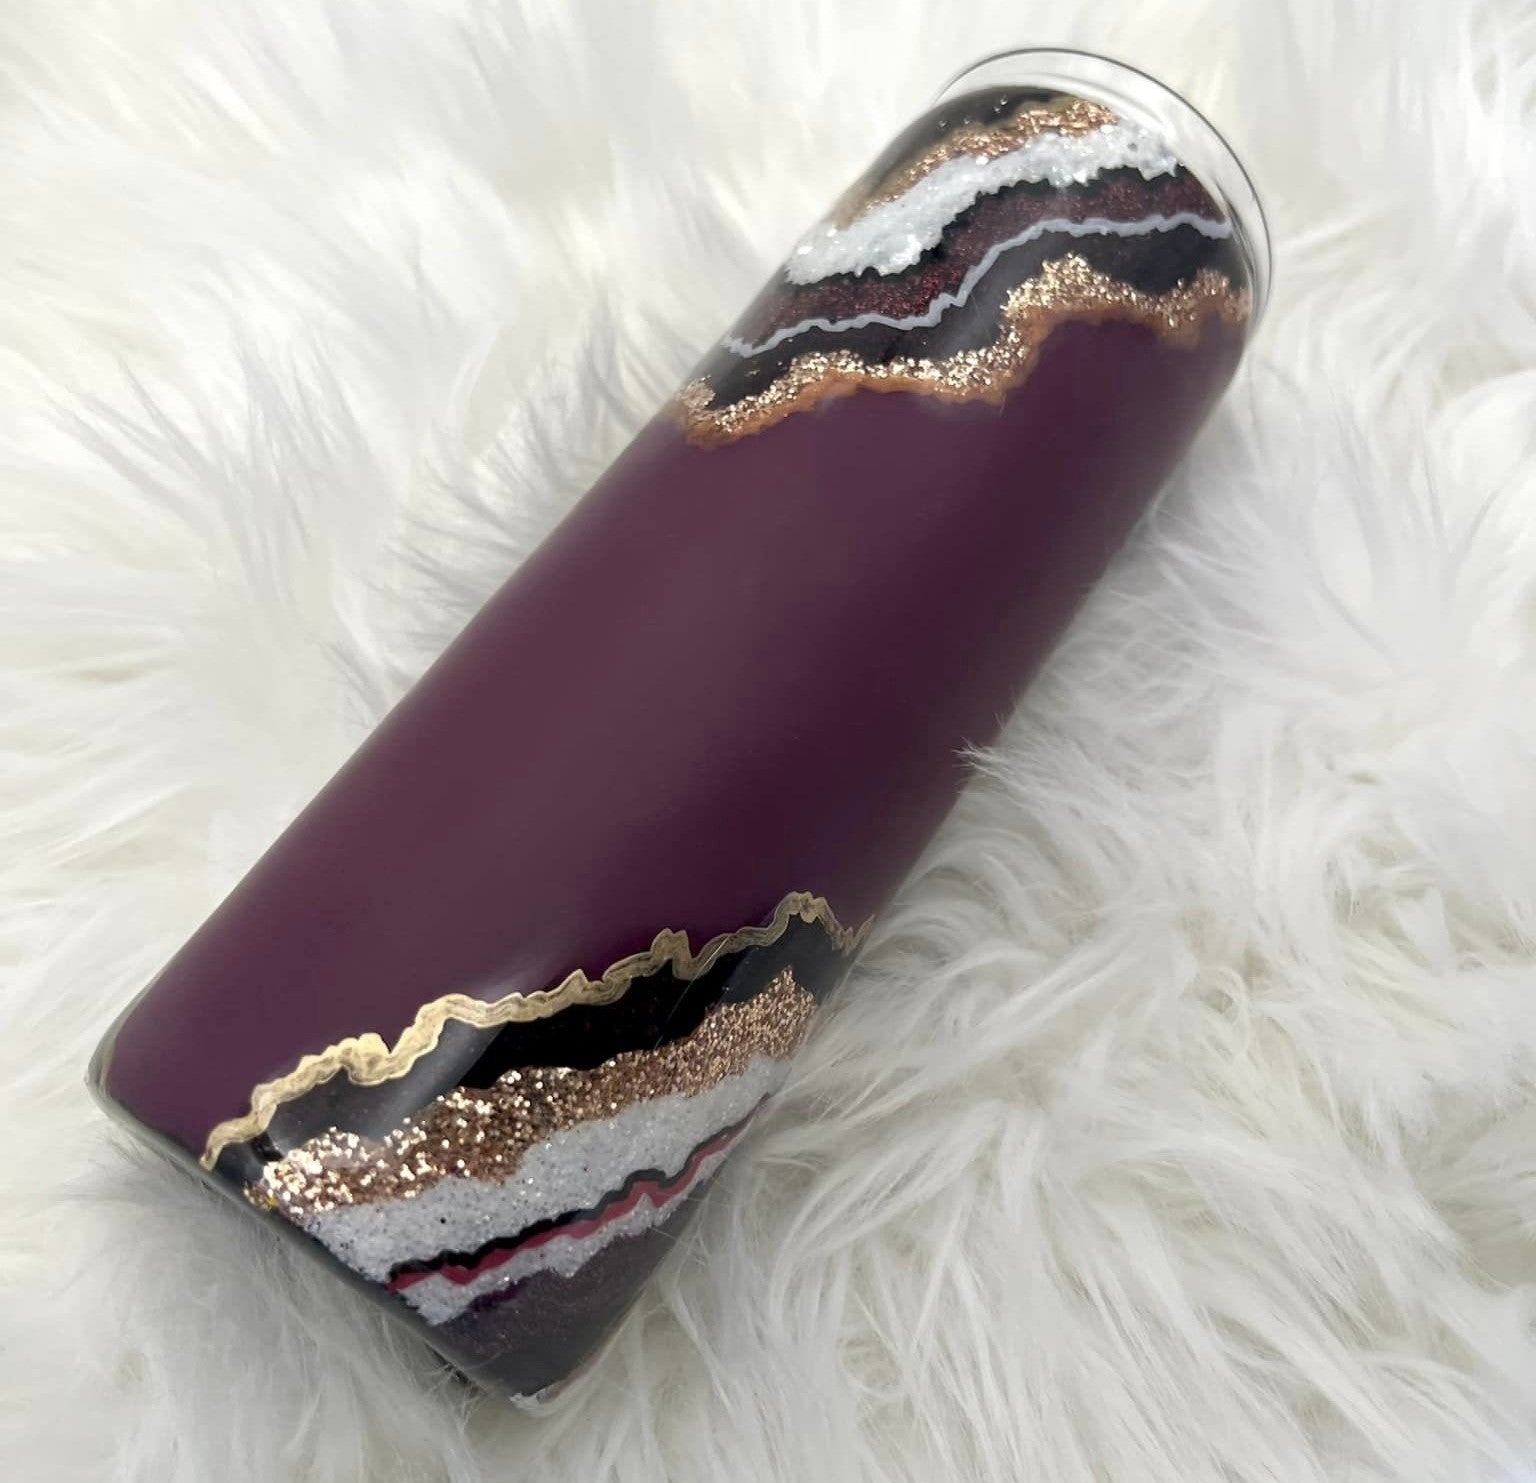
Hey guys, welcome to the 8th day of my ten days of fall. Today's cup is this beautiful geode with a matte finish inside. I don't know what you call this, but Jihad was inspired by my perfect friend Megan from Fine Designs by Megan. She is known for her geodes, and I tried to do one. Hers is better than mine, but just keep that in mind. I wanted to do something a little different with the colors and make it fall-like. I tried to add the burgundy color, and I think it turned out pretty well for fall. I love the colors. Yes, it's all fall. I love it so much.
I'm starting with this 30-ounce skinny cup, just taking off the lid and the little sticker thing on the bottom, then prepping with mattifying and an abrasive pad. Once it was all dry, I used Aubergine Rust-Oleum paint in this gorgeous burgundy color, and I don't know what happened to my phone stopped recording, but here it is all done. Such a pretty fall color. Then I will take these gems and make a saddle out of them. This is a pretty dark Gold Fever. Ace High is such a gorgeous color. It's like a burgundy that matches that spray paint.


We have Snowy in the middle. I also end up using chunky what I'm doing, and the best way to do this is to not think about it. You want it to look natural and just be kind of random you don't want anything too perfect you don't want it to like straight or even just let your hand just go and make random little Jagged motions, so this was inspired by my good friend Megan at Fine Designs by Megan she is known for her geodes she makes them the most beautiful I will link her Channel Down Below she has a YouTube channel as well but uh the nice thing about using Color fix paint.
You can just literally do the paint and the glitter right away. You don't have to do any other steps. It's simple and easy and you can do this at the same time as you can go on with the next color at the same time. You don't have to wait between colors, so that was our geode at the bottom of the cup. This is going to be one on the other side at the top, so again just taking little Jagged motions letting my hand kind of do the work, and not thinking about it too much foreign.


I'm using some gold color flex paint. This is a test one. We will be coming out with metallic colors soon, but the same thing is happening with the gold, just next to that other color. I'm trying not to make it super the same line, like sometimes a little thicker, sometimes a little thinner. Still, you get the idea of doing it a little more randomly than straight and even and precisely following the other line rather than going on with Gold Fever. I also like to mix more delicate and significant cuts of glitter for this because if you use the same amount of glitter, it won't look as nice. I feel the different sizes give you different textures, and it seems like geodes.
You also want to make sure when you're using color, fix the paint, not to like, to ensure you're getting enough on there. You want to have enough on there for the glitter to adhere to. Then just keep going in with the different colors and filling in all the spots. Here I'm doing some white color fix paint for snowy glitter. It's just pure white glitter with a kind of pop of silver in it.
So, for the middle section, use Snowy and medium, then go in and touch up if necessary. So I decided to make the bottom all one color. Here is what my geode looked like. So next, I sealed the geode with clear spray paint and put a layer of epoxy on top. Then we're going in with different colors of paint pens. So as long as you get nice ones, this will work great, so I have this white one I'm starting with, and you're just going to do lines. You can do them in between colors or in the middle of colors, just kind of wherever you feel would look good, but again, just let your hand make random motions, don't think about it too much, and I'm just going to speed it up.


That is what it looked like, all finished with my paint pen. I went on with two more epoxy layers to finish the cup. Then I let it sit for three days before I did the mature going to cover the geode part, so I just took the painter's tape, and I just folded and moved in with my nail the tape around. It doesn't need to be entirely exact, but just getting it close enough to where we can do the mat around it, and you're not going to see it's just going to be a line, but it.
I did that along both the geodes and the bottom because I just really like the contrast of the shiny and the matte on one cup together, so whenever I have an idea to do that, whether it's a faded look or part polished and part matte with like a hard line like this, I love doing it. So then I rinsed that off, and you can see I did not get all up next to that tape and get that to be matte, so I scrubbed again, ensuring the edges were well. So let me know what you guys think in the comments, and don't forget to come back and check out my other fall videos. I'll see you at the next one. Bye.
FOIL LEOPARD AND GOLD MUG Tumbler Tutorial! Day 7th 10 Days of Fall!
FALL FAWN GLITTER SWIRL Tumbler Tutorial! Day 9 of 10 Days of Fall!
Related Posts

DiY Epoxy vs. Artistry Epoxy: What Happened to “Speedy Petey” and What’s the Best Epoxy for Tumblers & Art?

How Long Does It Take for Epoxy to Yellow (And How to Prevent or Fix It Like a Pro)

Top Reasons Why Your Epoxy Is Sticky and How to Avoid Them

Top 10 Epoxy Tumbler Ideas with Glitter, Pigments & More

How to Mix Epoxy Resin Like a Pro: The Ultimate Guide for Tumbler Artists & DIY Crafters

BRIDAL Tumbler Tutorial using Shape Tape Double sided adhesive sheets!
