Initial V-Split Water Bottle Tumbler Tutorial!
Hey guys, it has been a while since I filmed a tutorial, but I am back. This is the cup I'm doing. I loved the color. I wanted to do something with this color but just to stain this cup from ross for 9.99, so I'm just peeling off all the stickers and labels.
I also wanted to mention today is the first we are doing customer appreciation month over at artistry epoxy, so if you guys want to know all about it and the giveaways go check it out. I'm prepping with mattifying, so now I'm just taping off the edge. I love to use electrical tape. I feel like it's just the most effortless. It goes on nice and smooth. I just love electrical tape for this, but that way, we won't get any paint, epoxy, glitter, glue, or anything on that top rim, so next, I am putting this little.
I don't know what this is. My husband made it and figured it out, but it is just hooking it to the cup, taking some glitter glue, and this is peaches and queen. This is our collab with queen bling. She's fantastic, and I love this color so much, and I figured it would go perfectly on this kind of peachy color.


It's a kind of peachy coral color, so there it is peaches, and queen by queen bling; look how pretty just doing a full coverage on the whole thing, and just to mention a little bit more about customer appreciation month we are doing tons of giveaways we are doing random upgrades we're just like randomly selecting people, unexpected customers, that kind of share about their order online. We're just going to send you free stuff like it's going to be a lot of fun, and I hope you guys join in on the fun. The Giveaways: Once that was dry, I'm just using clear spray paint to seal it, then going on with my first coat of artistry epoxy. This is the one-to-one facet, and I know we can still see the logo of the cup, but we're going to cover that up later, so it doesn't matter, right?
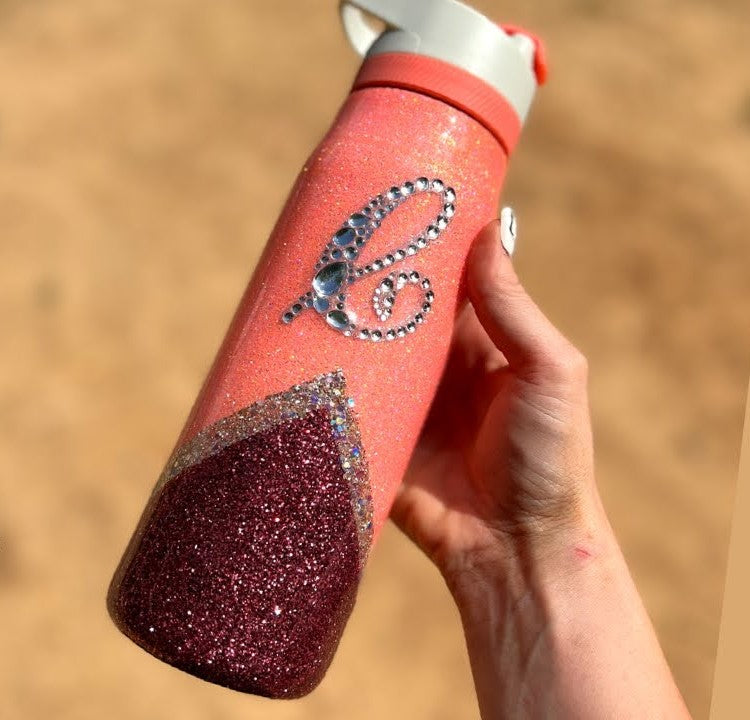
Now do a second coat so that we have an excellent smooth base for our next layer next step. So then take some tape and just kind of taping off a triangle section on the bottom, and we're just doing it right over that logo, then take some glitter glue. I find it's just easiest to use it on a gloved hand glove you put on with your hand with a glove. I don't know why that sounded weird, but it did. It works so much easier you can spread it nice and thin a brush also works. It just takes a little longer.
I feel like this is a desert rose from my glitter line color flex. I thought it would be a beautiful color to complement this like a peachy tone, so sprinkling that on the bottom, I had initially been left out the bottom, but I decided later to kind of cover it back up, and if you have any patchy spots just go back in with some glitter glue and more glitter and you don't need to wait till it dries.


You can do it while it's still wet, then just peel off that tape to reveal the nice clean line. I don't know what it is about stuff like this peeling off stickers or tape. It's so satisfying, then here I am, adding more to the bottom. I felt I should cover the whole bottom because it was just not. I was not feeling it, so I added more, coating the entire base.
I let that dry, and once it was dry, I went back in, leaving a little space to do another line of glitter, then took glitter glue. I am using a brush this time just so we can be more precise with our application, spreading it right in there rather than taking the new dawn. This was my new year's eve mix. It's like a bar of silver with holographic and champagne colors. It's just beautiful and a chunky mixture, so I put that all up in that line to give us a nice blingy pop again. I am peeling off the tape is so satisfying.
I let that dry and sealed that with clear spray paint, going on with more epoxy. Once that was nice and smooth with the epoxy, I found these little jewels at Michael's. I thought they were so cute. I loved that there were different size jewels on there. That was my favorite part about it, but of course, they have all the letters, and I think it was only two or three dollars like it was not expensive.


It was a little tricky to get off the paper and get it stuck because it was just folding and bending all over the place. Still, I just stuck it right above our type of triangle there, but it looks gorgeous like all of you ladies that do the hand-placed Gemstones. If you guys do that, it's impressive, but if you don't have the patience, keep doing it. You just need an initial go to Michael's because they have all the letters; of course, why would they not if you want your sticker to stick? I suggest heating it with a heat gun of some kind. This is an embossing gun, but that will make the adhesive warm up, be extra sticky, and stick to your cup.
I did two more coats of the facet epoxy, and she was done, so she's taking her off the turner, unscrewing our little red doohickey to hook this on, and just removing the tape and putting the lid on. That was it. I think she is so cute. I just it's so simple but stunning at the same time, and I love the two-toned deep dark tone with the peachy color. It just matched so. Ideally, that is it for this video, guys. Thank you so much for watching, and make sure you tune in for our customer appreciation month. All right, see you in the next one bye.
NEON QUEEN RAINBOW POWERWASH PEEKABOO TUMBLER TUTORIAL!
Stay Cozy Leopard Print Tumbler!
Related Posts

DiY Epoxy vs. Artistry Epoxy: What Happened to “Speedy Petey” and What’s the Best Epoxy for Tumblers & Art?

How Long Does It Take for Epoxy to Yellow (And How to Prevent or Fix It Like a Pro)

Top Reasons Why Your Epoxy Is Sticky and How to Avoid Them

Top 10 Epoxy Tumbler Ideas with Glitter, Pigments & More

How to Mix Epoxy Resin Like a Pro: The Ultimate Guide for Tumbler Artists & DIY Crafters

BRIDAL Tumbler Tutorial using Shape Tape Double sided adhesive sheets!
