
STARBUCKS Christmas Themed Tumbler Tutorial!
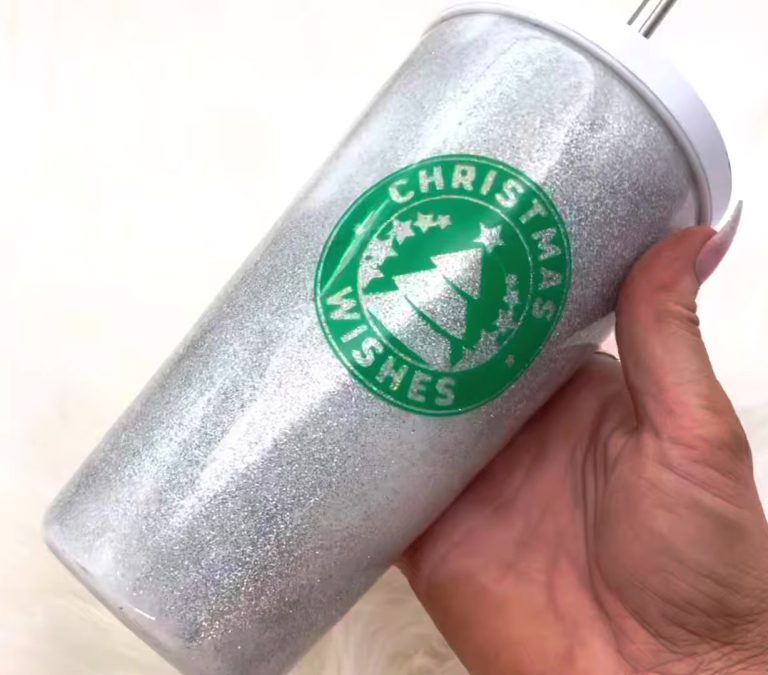
Hey guys, Today I have the Cutest Starbucks logo cup made to say Christmas wishes with a little Christmas tree and some stars, then the back says holly jolly, and a bunch of Christmassy things in silver holographic glitter. I am keeping this one. I'm going to keep it and use it's so fun. This is one of my favorite Christmas cups. So let's get into the tutorial.
This cup is from Michaels, and it would be perfect because it has the same shape and size lid the Starbucks. So taking off the lid and the little plastic package part, then prepped it with mattify. So then, I didn't need to paint it. I'm doing the tacking method and notice my bottle has glitter all over it.


I had this idea to use a silver holographic glitter and do the tack-it method where you rub it, and it lays flat and looks more metallic; that's what I did. So this is a fine silver holographic glitter. This is one of the glitters that I have, but it's not released in my color flex line, but I'm thinking about putting this in a collection soon. So let me know if you need holographic glitters if that's something you guys look for, but sprinkling is full coverage over the entire cup.
Then I said, with the tack its method, I started gently rubbing. This doesn't work as well as white iridescent glitter, but it looked fantastic. I gently kept rubbing the entire cup, but it laid flatter and gave it a more shiny metal look rather than a chunky textured glitter which I thought would be cool. And it could have worked better on the bottom. It seemed to wipe off easier. So then, after it dried, it came off in a couple of parts where I rubbed a little too hard. Maybe so. I decided to go with it and do a more distressed look.
When something goes wrong, I usually go with it and make it part of the design instead of trying to fix and perfect it. It takes a lot less time. It usually turns out excellent instead of plain, whatever I was going to do, so I sanded off parts. Then I wanted it a little more distressed, so it wasn't standing off as much as I wanted it to take some white acrylic paint and a paintbrush painted on little distressed spots to make it look worn in areas.


When you do this, you want to wipe off a lot of the paint. You only have a little on the brush, then go around the top and the Bottom and then random parts here and there. Once I was dry, I did my first layer of artistry epoxy. Then it was time for a decal. I made this little decal over the app and in canvas. I used both because then both have had different elements that I like.
Then I initially cut out the little words on the little squares. Still, they ended up cutting out the way too small to do the words separately but using some packing tape because I couldn't find any regular transfer tape or anything, so I put the decal on the front of my cup and then added the decal on it the back. Then I cut out my little words in a bigger font. It worked, but then I had to weed out the little tiny insides of the o's and cut them to make it easier. Finally, I stuck my small words right above the little squares, and you could put whatever you wanted here. I wrote things that I think of when I think of Christmas.


Then I have this little pack of these iridescent sparkly snowflakes. Adding one of the bottoms would add a bit cute Touch and hide the bottom like rippling whatever is on the bottom, another layer of the epoxy, then one final coat to finish this Starbucks cup. Hence, there is the last cup. I am obsessed with how it turned out under these lights. Of course, you don't see the holograph as much as you do in real life, but it's a pretty rainbow shine in real life.
So now let's package it. Why not put a Starbucks gift card in me,t uh because hello, it's Starbucks. Then I also grabbed one of their little brown bags. It would be a cute little, even though it was not from Starbucks. So that's how I felt about packaging it, putting the little gift card inside, then wrapping it in some of the Starbucks-colored green tissue paper and leaving it flooded up at the top, then adding a little more of the white tissue paper on the sides of the Green, and there is the finished gift thank you guys so much for watching and stay tuned bye tomorrow.
Related Posts

DiY Epoxy vs. Artistry Epoxy: What Happened to “Speedy Petey” and What’s the Best Epoxy for Tumblers & Art?

How Long Does It Take for Epoxy to Yellow (And How to Prevent or Fix It Like a Pro)

Top Reasons Why Your Epoxy Is Sticky and How to Avoid Them

Top 10 Epoxy Tumbler Ideas with Glitter, Pigments & More

How to Mix Epoxy Resin Like a Pro: The Ultimate Guide for Tumbler Artists & DIY Crafters

BRIDAL Tumbler Tutorial using Shape Tape Double sided adhesive sheets!
